Java里面随处可见annotation(注解),RetentionPolicy 指示了注解使用的情况:
SOURCE,比如 @Override, @SuppressWarnings
RUNTIME,最熟悉的莫过于Spring Bean中使用的 @Controller, @Service 一般和反射同时使用。
CLASS
而 CLASS 则是用于 compile 编译阶段的注解。一个注解的处理器,以Java代码(或编译过的字节码)作为输入,生成Java文件。这些生成的Java文件,会同其他普通的手动编写的Java源代码一样被javac编译。
可以自己实现一些类似groovy语法糖的功能(lombok框架修改bytecode为类生成新方法getter/setter、或者使用生成新的辅助类等);减少机械的、冗余代码的管理,使得代码更简洁便于阅读。
代码生成
先来了解下整个过程,javac 从 ServiceLoader 获取一个 Processor 标注处理类,判断是否为符合条件的标注,再收集类的相关信息,然后使用 Filer 创建新的类。Java Annotation Processing and Creating a Builder ,java annotation processor 主要涉及到如下三部分:
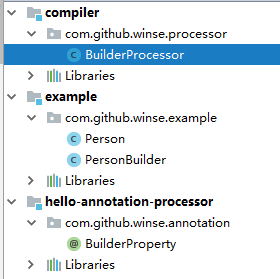
项目的目录结构如下:
具体实现:
1
2
3
4
5
6
7
8
9
10
11
package com.github.winse.annotation;

import java.lang.annotation.ElementType;
import java.lang.annotation.Retention;
import java.lang.annotation.RetentionPolicy;
import java.lang.annotation.Target;

@Target(ElementType.METHOD)
@Retention(RetentionPolicy.SOURCE)
public @interface BuilderProperty {
}
1
2
3
4
5
6
7
8
9
10
11
12
13
14
15
16
17
18
19
20
21
22
23
24
25
26
27
28
29
30
31
32
33
34
35
36
37
38
39
40
41
42
43
44
45
46
47
48
49
50
51
52
53
54
55
56
57
58
59
60
61
62
63
64
65
66
67
68
69
70
71
72
73
74
75
76
77
78
79
80
81
82
83
84
85
86
87
88
89
90
91
92
93
94
95
96
97
98
99
100
101
102
103
104
package com.github.winse.processor;

import com.github.winse.annotation.BuilderProperty;
import com.google.auto.service.AutoService;

import javax.annotation.processing.*;
import javax.lang.model.SourceVersion;
import javax.lang.model.element.Element;
import javax.lang.model.element.TypeElement;
import javax.lang.model.type.ExecutableType;
import javax.tools.Diagnostic;
import javax.tools.JavaFileObject;
import java.io.IOException;
import java.io.PrintWriter;
import java.util.List;
import java.util.Map;
import java.util.Set;
import java.util.stream.Collectors;

/**
 * @see BuilderProperty
 */
@SupportedAnnotationTypes("com.github.winse.annotation.BuilderProperty")
@SupportedSourceVersion(SourceVersion.RELEASE_8)
@AutoService(Processor.class)
public class BuilderProcessor extends AbstractProcessor {

    @Override
    public boolean process(Set<? extends TypeElement> annotations, RoundEnvironment roundEnv) {
        for (TypeElement annotation : annotations) {
            Set<? extends Element> annotationElements = roundEnv.getElementsAnnotatedWith(annotation);

            Map<Boolean, List<Element>> annotationMethods = annotationElements.stream()
                    .collect(Collectors.partitioningBy(element -> ((ExecutableType) element.asType()).getParameterTypes().size() == 1 && element.getSimpleName().toString().startsWith("set")));

            List<Element> setters = annotationMethods.get(true);
            List<Element> otherMethods = annotationMethods.get(false);

            otherMethods.forEach(element -> processingEnv.getMessager().printMessage(Diagnostic.Kind.ERROR, "@BuildProperty must be applied to a setXxx method with a single argument", element));

            if (setters.isEmpty()) {
                continue;
            }

            String className = ((TypeElement) setters.get(0).getEnclosingElement()).getQualifiedName().toString();

            Map<String, String> setterMap = setters.stream().collect(Collectors.toMap(
                    setter -> setter.getSimpleName().toString(),
                    setter -> ((ExecutableType) setter.asType()).getParameterTypes().get(0).toString()
            ));

            try {
                writeBuilderType(className, setterMap);
            } catch (IOException e) {
                processingEnv.getMessager().printMessage(Diagnostic.Kind.ERROR, e.getMessage());
            }
        }
        return true;
    }

    private void writeBuilderType(String className, Map<String, String> setterMap) throws IOException {
        String packageName = null;
        int lastDot = className.lastIndexOf(".");
        if (lastDot > 0) {
            packageName = className.substring(0, lastDot);
        }

        String simpleClassName = className.substring(lastDot + 1);
        String builderClassName = className + "Builder";
        String builderSimpleClassName = builderClassName.substring(lastDot + 1);

        JavaFileObject builderFile = processingEnv.getFiler().createSourceFile(builderClassName);
        try (PrintWriter out = new PrintWriter(builderFile.openWriter())) {
            if (packageName != null) {
                out.printf("package %s;\n", packageName);
                out.println();
            }

            out.printf("public class %s {\n", builderSimpleClassName);
            out.println();
            out.printf("  private %s object = new %s();\n", simpleClassName, simpleClassName);
            out.println();
            out.printf("  public %s build() {\n", simpleClassName);
            out.printf("    return object;\n");
            out.printf("  }\n");
            out.println();

            setterMap.entrySet().forEach(setter -> {
                String methodName = setter.getKey();
                String argumentType = setter.getValue();

                out.printf("  public %s %s(%s value){\n", builderSimpleClassName, methodName, argumentType);
                out.printf("    object.%s(value);\n", methodName);
                out.printf("    return this;\n");
                out.printf("  }\n");
                out.println();
            });

            out.printf("}\n");

        }
    }

}
测试使用:
我使用的是4.7的版本,4.7及以上版本可以直接使用 annotationProcessor 来添加标注处理器。(其他版本可以使用 apt 来处理)
1
2
3
4
5
6
7
8
9
10
plugins {
    id "net.ltgt.apt" version "0.10"
}

sourceSets.main.java.srcDirs += ['build/generated/source/apt/main']

dependencies {
    compile rootProject
    annotationProcessor project(':compiler')
}
这是一个POJO类,BuilderProcessor处理器会根据BuilderProperty注解来生成PersonBuilder类。
1
2
3
4
5
6
7
8
9
10
11
12
13
14
15
16
17
18
19
20
21
22
23
24
25
26
package com.github.winse.example;

import com.github.winse.annotation.BuilderProperty;

public class Person {
    private int age;
    private String name;

    @BuilderProperty
    public void setAge(int age) {
        this.age = age;
    }

    @BuilderProperty
    public void setName(String name) {
        this.name = name;
    }

    public int getAge() {
        return age;
    }

    public String getName() {
        return name;
    }
}
生成代码效果
在 gradle 面板中选择子项目 :example ,然后选择 Tasks 下的 build 任务进行构建。构建完后在 example/build/generated/source/apt 目录下生成了对应的 Builder 代码。
1
2
3
4
5
6
7
8
9
10
11
12
13
14
15
16
17
18
19
20
21
package com.github.winse.example;

public class PersonBuilder {

  private Person object = new Person();

  public Person build() {
    return object;
  }

  public PersonBuilder setName(java.lang.String value){
    object.setName(value);
    return this;
  }

  public PersonBuilder setAge(int value){
    object.setAge(value);
    return this;
  }

}
注解处理器调试
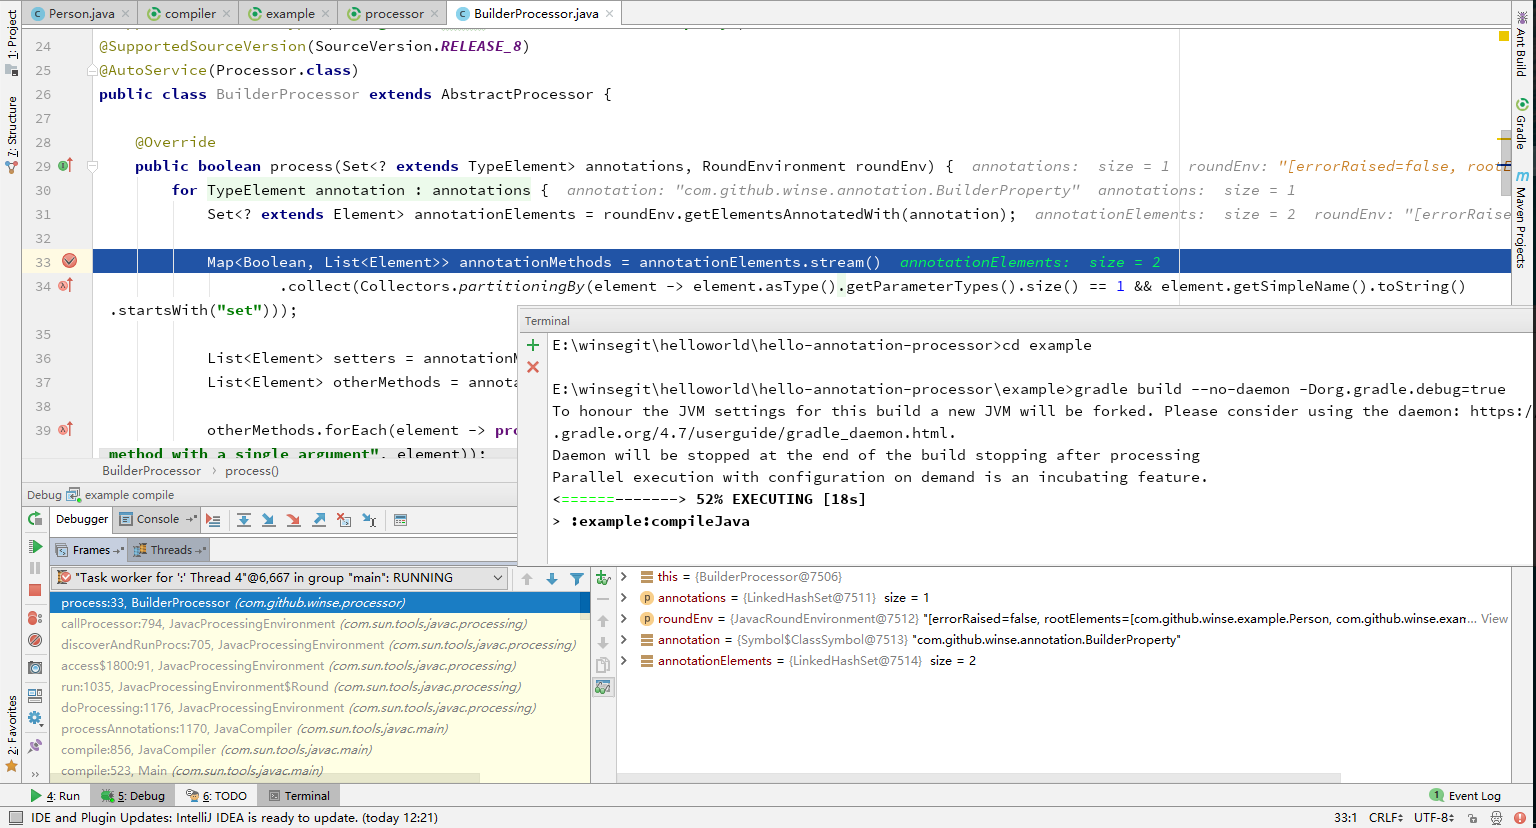
不会调试说明还没有真正的入门。并且没有调试的情况下,解决异常、错误也是一件异常痛苦的事情。注解处理器生成代码是在编译阶段来生成代码的,所以调试的选项配置添加到 javac 。而 gradle 提供了一种相对简单的方式来进行。
参考
具体步骤如下:
在命令行运行构建
添加调试参数后,gradle 会 暂停等待远程调试 ,相当于添加了 JVM 调试参数。Gradle properties
hello-annotation-processor\example>gradle clean build --no-daemon -Dorg.gradle.debug=true
或者
hello-annotation-processor>gradle example:clean example:compileJava --no-daemon -Dorg.gradle.debug=true
注: –no-daemon 不加也是可以的,但是运行该次构建后不会停止。
远程调试
其他调试配置方式
通过环境变量
example>set GRADLE_OPTS=-agentlib:jdwp=transport=dt_socket,server=y,suspend=y,address=5005

example>gradle clean build
Listening for transport dt_socket at address: 5005
修改 ~/.gradle/gradle.properties
这种方式不推荐,因为它是全局的。
org.gradle.daemon=false
org.gradle.debug=true
或者
org.gradle.daemon=true
org.gradle.jvmargs=-XX:MaxPermSize=4g -XX:+HeapDumpOnOutOfMemoryError -Xmx4g -agentlib:jdwp=transport=dt_socket,server=y,suspend=n,address=5006

$ gradle --daemon
Then attach your debugger client to port 5006, set your breakpoint, then run your test.
注:该配置放到项目目录下没用。
其他
–END


