Winse Blog

走走停停都是风景, 熙熙攘攘都向最好, 忙忙碌碌都为明朝, 何畏之.

解决SecureCRT【zmodem Transfer Canceled by Remote Side】问题

处理方法很简单,解决后,对于ssh机器之间多次跳转的文件传输操作会方便很多。

1
2
3
4
5
6
7
8
9
10
11
12
13
14
15
写到/etc/profile以后就可以直接使用了
[root@af042cb4b34c ~]# alias rz="rz -e"

[root@af042cb4b34c ~]# cd /usr/share/cacti/
[root@af042cb4b34c cacti]# cd plugins
[root@af042cb4b34c plugins]# rz
rz waiting to receive.
Starting zmodem transfer.  Press Ctrl+C to cancel.
Transferring monitor-v1.3-1.tgz...
  100%     231 KB     231 KB/sec    00:00:01       0 Errors  

[root@af042cb4b34c plugins]# ll
total 236
-rw-r--r-- 1 root root     44 Aug  7  2013 index.php
-rw-r--r-- 1 root root 236682 Sep 21 07:54 monitor-v1.3-1.tgz

zmoden还是有比较多的限制。sftp还是不能少啊!!

参考

–END

【linux 101 Hacks】读后感

本书讲了linux维护和管理过程中常用的命令。

分12个章节,分别将了目录切换、日期、SSH远程登录、常用linux命令、PS1-4操作提示符、解压缩、命令历史记录、系统管理、容器服务器Apache、脚本环境变量、性能监控等。

介绍的命令有:cd, dirs, pushd, popd, cdpath, alias, mkdir, eval, date, hwclock, ssh, grep, find, 输出重定向, join, tr, xargs, sort, uniq, cut, stat, diff, ac, ps1, ps2, ps3, ps4, PROMPT_COMMAND, zip, unzip, tar, gzip, bzip2, HISTTIMEFORMAT, HISTSIZE, HISTIGNORE, fdisk, mke2fsk, mount, tune2fs, useradd, adduser, passwd, groupadd, id, ssh-copy-id, ssh-agent, crontab, apachectl, httpd, .bash_rc, .bash_profile, 单引号, 双引号, free, top, ps, df, kill, du, lsof, sar, vmstat, netstat, sysctl, nice, renice等等。

下面结合工作中的一些实践,谈一谈

技巧一:登录服务器

不管是正式环境还是云端的测试环境,一般提供给我们访问的只有一个入口(也就是常说的跳板机),登录跳板机后然后才能连接其他服务器。常用的工具有【SecureCRT】和【Xshell】,它们的使用方式基本相同。

最佳实践:连接跳板机的同时,建立自己机器和内网机器之间的隧道,即可以方便浏览器的访问,同时也可以使用sftp直接传输文件到内网机器。
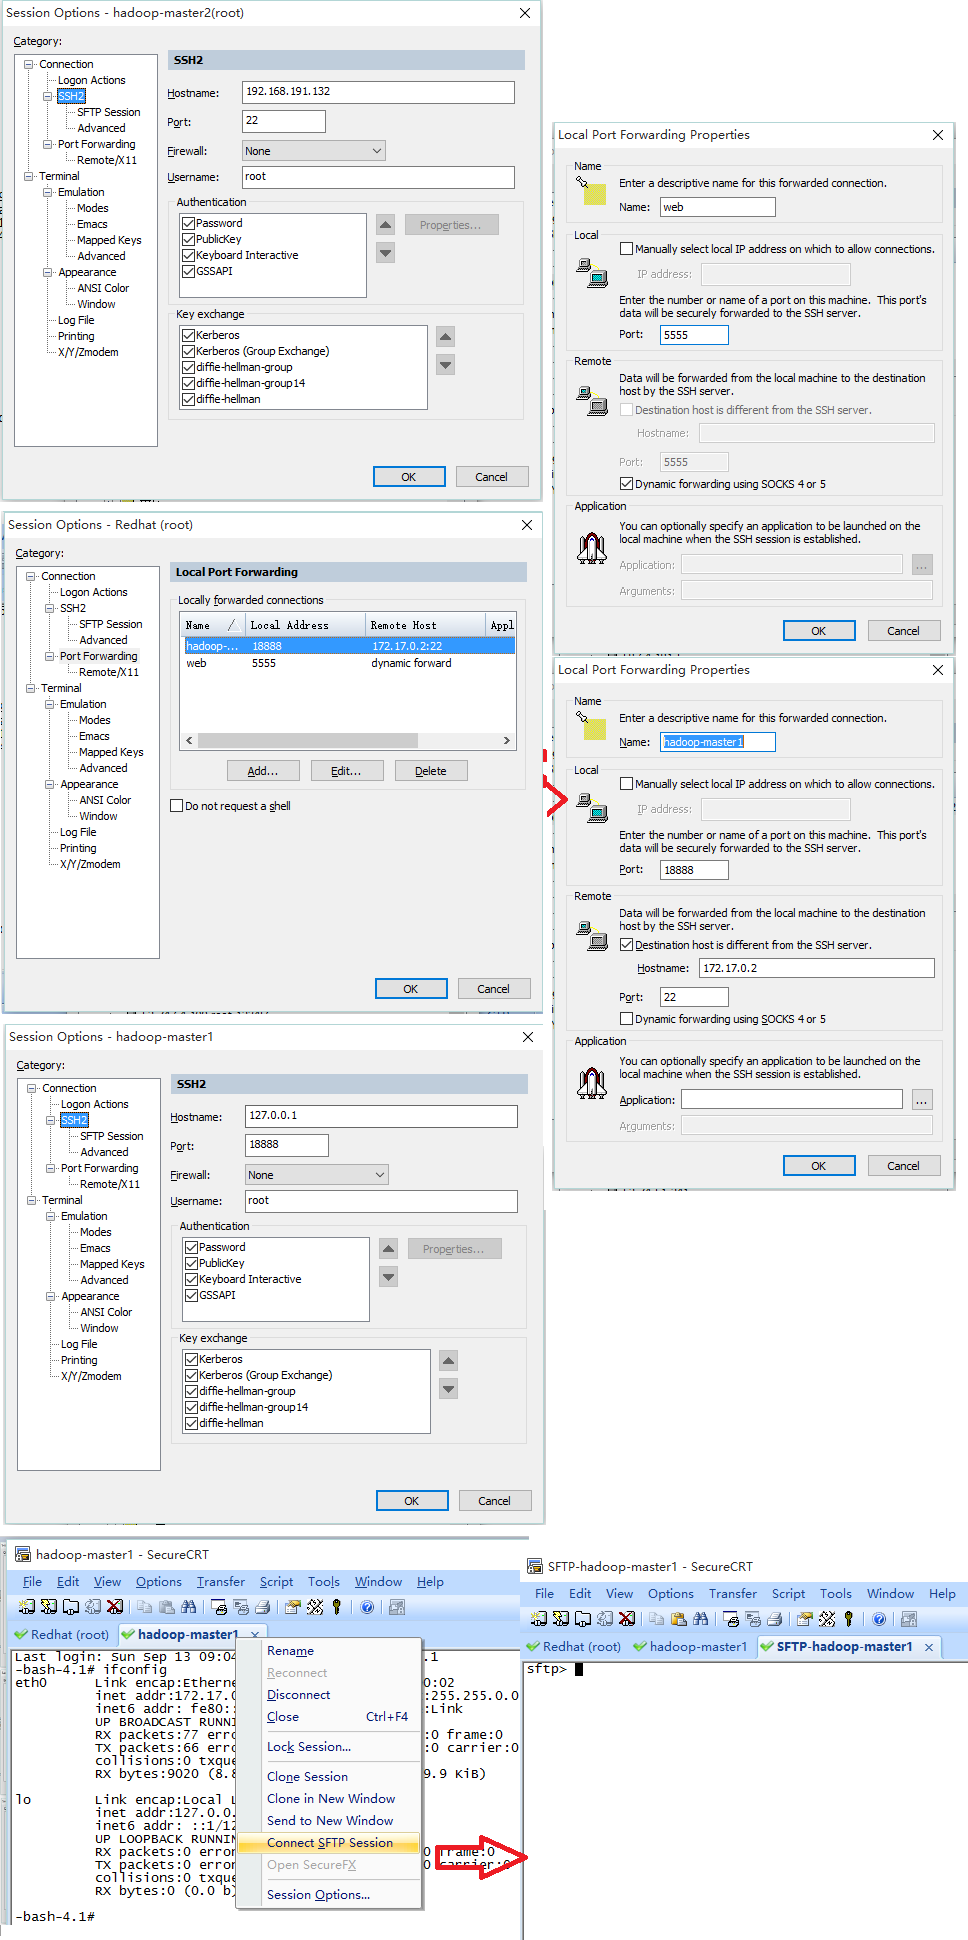
技巧二:ssh-copy-id【hack 72】

想不通,现在的教程都使用【复制-添加-修改权限】公钥的方式来进行无密钥登录配置。

1
2
3
4
5
6
7
8
9
10
11
[hadoop@hadoop-master1 ~]$ scp .ssh/id_rsa.pub 172.17.0.3:~/master_id_rsa.pub
hadoop@172.17.0.3's password: 
id_rsa.pub                                                                                                                     100%  403     0.4KB/s   00:00    
[hadoop@hadoop-master1 ~]$ ssh 172.17.0.3
hadoop@172.17.0.3's password: 
Last login: Sun Sep 13 11:41:17 2015 from 172.17.0.2
[hadoop@hadoop-slaver1 ~]$ cat master_id_rsa.pub >> .ssh/authorized_keys 
[hadoop@hadoop-slaver1 ~]$ ll -d .ssh
drwx------. 2 hadoop hadoop 4096 Mar 10  2015 .ssh
[hadoop@hadoop-slaver1 ~]$ ll .ssh/authorized_keys 
-rw-------. 1 hadoop hadoop 403 Sep 13 11:58 .ssh/authorized_keys

处理一个ssh无密钥登录搞N多的步骤,还不一定能成功!其实使用ssh-copy-id的命令就行了,不知道各类书籍上面都使用老旧的方法,都是抄来的吗?!

1
2
3
4
5
6
7
8
9
10
11
[hadoop@hadoop-slaver1 ~]$ ssh-copy-id -i .ssh/id_rsa.pub 172.17.0.2
The authenticity of host '172.17.0.2 (172.17.0.2)' can't be established.
RSA key fingerprint is aa:41:79:6d:9d:c2:ec:f1:29:71:43:24:39:09:58:b6.
Are you sure you want to continue connecting (yes/no)? yes
Warning: Permanently added '172.17.0.2' (RSA) to the list of known hosts.
hadoop@172.17.0.2's password: 
Now try logging into the machine, with "ssh '172.17.0.2'", and check in:

  .ssh/authorized_keys

to make sure we haven't added extra keys that you weren't expecting.

技巧三:查看机器

碰到不认识的人,我们都会上下打量。机器也一样,首先要了解机器,才能充分的发挥自己的性能。存储不够要么删点,要么加磁盘等等。

1
2
3
4
5
6
7
8
9
10
11
12
13
14
15
16
uname -a
cat /etc/redhat-release 
ifconfig

date

df -h , df -Tha
free -m 
uptime
top
ps aux , ps auxf
netstat -atp
du -h --max-depth=1
lsof -i:[PORT]

cat /etc/hosts

技巧四:管道

一个命令的结果直接输出给另一个命令。就像水从一个结头通过管子直接流向下一个结头一样。中间不需要落地,直接立即用于下一个命令,直到结果输出。

1
cat /etc/hosts | grep 'hadoop' | awk '{print $2}' | while read h ; do echo $h ; done

shell的命令那么多,简单功能的材料都准备好了,就像堆积木一样,叠加后总能实现你想得到的效果。

在进行一次性文件拷贝时,如果文件数量过多,可以先打包然后传到远程机器再解压:

1
tar zc nginx | ssh bigdata1 'tar zx'

技巧N:查看帮助

写java的没看过开源项目不要说自己会java,写shell没用过man不要说自己会shell!

1
2
3
4
5
man [CMD]
info [CMD]
[CMD] help
[CMD] -h
[CMD] -help

总有一款适合你,带着实践和问题的目的去学/写,能更好的把握它。(shell的命令太多,不要寄希望于看一个宝典就能写好!实践出真知,真正用到的才是实用的)

技巧N-1:调试Shell脚本

Shell脚本/命令在执行前会对变量进行解析、处理。查看最终执行的命令,能让我们了解到脚本不正确的地方,然后及时进行更正。

1
2
3
4
5
6
7
8
9
10
11
12
13
14
15
16
17
set命令的参数说明
-v      Print shell input lines as they are read.
-x      After  expanding each simple command, for command, case command, select command, or arithmetic for command, 
display the expanded value of PS4, followed by the command and its expanded arguments or associated word list.
    
[hadoop@hadoop-master2 ~]$ set -x
[hadoop@hadoop-master2 1]$ cmd=*
+ cmd='*'
[hadoop@hadoop-master2 1]$ echo $cmd
+ echo 2 file
2 file
[hadoop@hadoop-master2 1]$ echo "$cmd" # 双引号
+ echo '*'
*
[hadoop@hadoop-master2 1]# echo '$cmd' # 单引号
+ echo '$cmd'
$cmd

调试脚本

1
2
3
4
5
6
7
8
9
10
11
12
13
14
15
16
17
18
19
20
[root@hadoop-master2 1]# vi run.sh
#!/bin/sh

bin=$(dir=`dirname $0`; cd $dir ; pwd)

cd $bin
ls -l

[root@hadoop-master2 1]# sh -x run.sh 
+++ dirname run.sh
++ dir=.
++ cd .
++ pwd
+ bin=/tmp/1
+ cd /tmp/1
+ ls -l
total 8
drwxrwxr-x 2 hadoop hadoop 4096 Sep 13 20:33 2
-rw-rw-r-- 1 hadoop hadoop    0 Sep 13 20:33 file
-rw-r--r-- 1 root   root     66 Sep 13 21:12 run.sh

技巧N-2:历史history

历史如足迹。如果你要学习前辈的经验,理着他的足迹,一步步的走!

很多书上说的,CTRL+R, !!, !-1, CTRL+P, ![CMD], !!:$, !^, ![CMD]:2, ![CMD]:$用于获取以后执行的命令或者参数,多半好看不实用。会写的也就前面1-2个命令重复用一下,上下方向键就可以了,不会写的用history查看全部慢慢学更实际点。

1
2
3
4
5
6
7
8
9
10
11
12
13
14
15
16
17
18
19
历史记录执行时间
export HISTTIMEFORMAT='%F %T '
输出最近10条历史
alias hist10='history 10'

持久化保存的历史记录数
vi ~/.bash_profile
HISTSIZE=450
HISTFILESIZE=450
# HISTFILE

忽略连续重复的命令
export HISTCONTROL=ignoredups

忽略重复的命令
export HISTCONTROL=erasedups

忽略指定的命令
export HISTIGNORE='pwd:ls'

技巧N-3:shell之grep awk sed vi

这些就不是看看man就能上手的,细嚼慢咽找几本书翻翻!!

推荐两本书: [sed与awk(第二版)], [Shell脚本学习指南]

技巧N-4:批量处理之神:expect/for/while

传入用户(与ssh的用户一致)密码,进行SSH无密钥认证:

1
2
3
4
5
6
7
8
9
10
11
12
13
14
15
16
17
18
19
20
21
[root@hadoop-master2 1]# vi ssh-copy-id.expect
#!/usr/bin/expect  

## Usage $0 [user@]host password

set host [lrange $argv 0 0];
set password [lrange $argv 1 1] ;

set timeout 30;

spawn ssh-copy-id $host ;

expect {
  "(yes/no)?" { send yes\n; exp_continue; }
  "password:" { send $password\n; exp_continue; }
}

exec sleep 1;

批量处理
[root@hadoop-master2 1]# for h in `cat /etc/hosts | grep hadoop | awk '{print $2}' ` ; do ./ssh-copy-id.expect $h root-password ; done

传入新用户名称和密码,新建用户:

1
2
3
4
5
6
7
8
9
10
11
12
13
14
15
16
17
18
19
20
21
22
23
24
25
26
27
28
29
30
[root@hadoop-master2 1]# vi passwd.expect
#!/usr/bin/expect  

## Usage $0 host username password

set host [lrange $argv 0 0];
set username [lrange $argv 1 1];
set password [lrange $argv 2 2] ;

set timeout 30;

##

spawn ssh $host useradd $username ;

exec sleep 1;

##

spawn ssh $host passwd $username ;

## password and repasswd all use this
expect {
  "password:" { send $password\n; exp_continue; }
}

exec sleep 1;

批量处理
[root@hadoop-master2 1]# for h in `cat /etc/hosts | grep hadoop | awk '{print $2}' ` ; do ./passwd.expect $h hadoop hadoop-password ; done

最后

当然还有很多命令,xargs, if等需要在实践中慢慢积累,shell博大精深继续码字!cdpath眼前一亮,alias还可以这么用!!

在linux把xml转成properties键值对形式的命令,觉得也挺有意思的:

1
2
3
4
5
6
7
8
9
10
11
12
13
14
15
16
17
18
19
20
21
22
23
24
25
[hadoop@hadoop-master2 ~]$ vi format.xslt
<xsl:stylesheet version="1.0" xmlns:xsl="http://www.w3.org/1999/XSL/Transform">
<xsl:output method="text" encoding="iso-8859-1"/>

<xsl:strip-space elements="*" />

<xsl:template match="/*/child::*">
<xsl:for-each select="child::*">
<xsl:if test="position() != last()"><xsl:value-of select="normalize-space(.)"/>=</xsl:if>
<xsl:if test="position() = last()"><xsl:value-of select="normalize-space(.)"/> <xsl:text>
</xsl:text> </xsl:if>
</xsl:for-each>
</xsl:template>

</xsl:stylesheet>

[hadoop@hadoop-master2 ~]$ xsltproc format.xslt ~/hadoop-2.2.0/etc/hadoop/yarn-site.xml
yarn.nodemanager.aux-services=mapreduce_shuffle
yarn.nodemanager.aux-services.mapreduce.shuffle.class=org.apache.hadoop.mapred.ShuffleHandler
yarn.resourcemanager.address=hadoop-master1:8032
yarn.resourcemanager.scheduler.address=hadoop-master1:8030
yarn.resourcemanager.resource-tracker.address=hadoop-master1:8031
yarn.resourcemanager.admin.address=hadoop-master1:8033
yarn.resourcemanager.webapp.address=hadoop-master1:8088
yarn.nodemanager.resource.memory-mb=51200=yarn-default.xml
yarn.scheduler.minimum-allocation-mb=1024=yarn-default.xml

–END

Oozie Start Guide

步骤记录

说明:cu2就是hadoop-master2

  1. 打包
1
2
3
4
[hadoop@cu2 oozie-4.2.0]$ vi bin/mkdistro.sh 
MVN_OPTS="-Dbuild.time=${DATETIME} -Dvc.revision=${VC_REV} -Dvc.url=${VC_URL} "

[hadoop@cu2 oozie-4.2.0]$ bin/mkdistro.sh -DskipTests -Dmaven.javadoc.skip=true
  1. 依赖
1
2
3
4
5
6
7
8
9
10
11
12
13
打包后,文件的位置
[hadoop@cu2 ~]$ tar zxvf sources/oozie-4.2.0/distro/target/oozie-4.2.0-distro.tar.gz

下载 <http://dev.sencha.com/deploy/ext-2.2.zip>

yum install zip

[hadoop@cu2 oozie-4.2.0]$ mkdir libext
[hadoop@cu2 oozie-4.2.0]$ cd libext/
[hadoop@cu2 libext]$ ll
total 7584
-rw-rw-r-- 1 hadoop hadoop 6800612 Sep  7 16:00 ext-2.2.zip
-rw-rw-r-- 1 hadoop hadoop  960372 Feb 28  2015 mysql-connector-java-5.1.34.jar
  1. 安装
1
2
3
[hadoop@cu2 oozie-4.2.0]$ bin/oozie-setup.sh prepare-war

setup后,生成的war的位置:/home/hadoop/oozie-4.2.0/oozie-server/webapps/oozie.war
  1. 初始化数据库
1
2
3
4
5
6
7
8
9
10
11
12
13
14
15
16
17
18
19
20
21
22
23
24
25
26
27
28
29
30
31
32
33
34
35
36
37
38
39
40
41
42
43
44
45
46
47
48
49
50
51
52
53
创建数据库用户

CREATE DATABASE oozie;
GRANT ALL ON oozie.* TO 'oozie'@'%' IDENTIFIED BY 'oozie';
FLUSH PRIVILEGES;
GRANT ALL ON oozie.* TO 'oozie'@'localhost'  IDENTIFIED BY 'oozie';
FLUSH PRIVILEGES;

show grants for oozie;

[hadoop@cu2 oozie-4.2.0]$ vi conf/oozie-site.xml 

<property>
<name>oozie.service.JPAService.jdbc.driver</name><value>com.mysql.jdbc.Driver</value>
</property>

<property>
<name>oozie.service.JPAService.jdbc.url</name><value>jdbc:mysql://localhost:3306/oozie</value>
</property>

<property>
<name>oozie.service.JPAService.jdbc.username</name><value>oozie</value>
</property>

<property>
<name>oozie.service.JPAService.jdbc.password</name><value>oozie</value>
</property>

这里直接把hadoop的jar添加到脚本中,不拷贝到libext下面
[hadoop@cu2 oozie-4.2.0]$ vi bin/ooziedb.sh
OOZIECPPATH=""
if [ ! -z ${HADOOP_HOME} ] ; then
  OOZIECPPATH="${OOZIECPPATH}:$($HADOOP_HOME/bin/hadoop classpath)"
fi

照着写就行了,不必考虑sql文件的存在与否
[hadoop@cu2 oozie-4.2.0]$ bin/ooziedb.sh create -sqlfile oozie.sql -run
  setting CATALINA_OPTS="$CATALINA_OPTS -Xmx1024m"

Validate DB Connection
DONE
DB schema does not exist
Check OOZIE_SYS table does not exist
DONE
Create SQL schema
DONE
Create OOZIE_SYS table
DONE

Oozie DB has been created for Oozie version '4.2.0'


The SQL commands have been written to: oozie.sql
  1. 启动服务
1
2
3
4
5
6
7
8
9
10
11
12
13
由于war中没有hadoop的jar,所以这里也需要把它们添加到tomcat
[hadoop@cu2 oozie-4.2.0]$ $HADOOP_HOME/bin/hadoop classpath | sed 's/:/,/g'
/home/hadoop/hadoop-2.7.1/etc/hadoop,/home/hadoop/hadoop-2.7.1/share/hadoop/common/lib/*,/home/hadoop/hadoop-2.7.1/share/hadoop/common/*,/home/hadoop/hadoop-2.7.1/share/hadoop/hdfs,/home/hadoop/hadoop-2.7.1/share/hadoop/hdfs/lib/*,/home/hadoop/hadoop-2.7.1/share/hadoop/hdfs/*,/home/hadoop/hadoop-2.7.1/share/hadoop/yarn/lib/*,/home/hadoop/hadoop-2.7.1/share/hadoop/yarn/*,/home/hadoop/hadoop-2.7.1/share/hadoop/mapreduce/lib/*,/home/hadoop/hadoop-2.7.1/share/hadoop/mapreduce/*,/home/hadoop/hadoop-2.7.1/contrib/capacity-scheduler/*.jar

处理下把*改成*.jar

[hadoop@cu2 oozie-4.2.0]$ vi oozie-server/conf/catalina.properties 
common.loader=${catalina.base}/lib,${catalina.base}/lib/*.jar,${catalina.home}/lib,${catalina.home}/lib/*.jar,/home/hadoop/hadoop-2.7.1/etc/hadoop,/home/hadoop/hadoop-2.7.1/share/hadoop/common/lib/*.jar,/home/hadoop/hadoop-2.7.1/share/hadoop/common/*.jar,/home/hadoop/hadoop-2.7.1/share/hadoop/hdfs,/home/hadoop/hadoop-2.7.1/share/hadoop/hdfs/lib/*.jar,/home/hadoop/hadoop-2.7.1/share/hadoop/hdfs/*.jar,/home/hadoop/hadoop-2.7.1/share/hadoop/yarn/lib/*.jar,/home/hadoop/hadoop-2.7.1/share/hadoop/yarn/*.jar,/home/hadoop/hadoop-2.7.1/share/hadoop/mapreduce/lib/*.jar,/home/hadoop/hadoop-2.7.1/share/hadoop/mapreduce/*.jar,/home/hadoop/hadoop-2.7.1/contrib/capacity-scheduler/*.jar

# 前台运行 bin/oozied.sh run
[hadoop@cu2 oozie-4.2.0]$ bin/oozied.sh start

http://localhost:11000/
  1. 测试
1
2
3
4
5
6
7
8
[hadoop@cu2 oozie-4.2.0]$ vi bin/oozie
OOZIECPPATH=""
if [ ! -z ${HADOOP_HOME} ] ; then
  OOZIECPPATH="${OOZIECPPATH}:$($HADOOP_HOME/bin/hadoop classpath)"
fi

[hadoop@cu2 oozie-4.2.0]$ bin/oozie admin -oozie http://localhost:11000/oozie -status
System mode: NORMAL
  1. 跑个helloworld
1
2
3
4
5
6
7
8
9
10
11
12
13
14
15
16
17
18
19
20
21
22
23
24
25
26
27
28
29
30
31
32
33
34
35
36
37
38
39
40
41
42
43
44
45
46
47
[hadoop@cu2 oozie-4.2.0]$ tar zxvf oozie-sharelib-4.2.0.tar.gz 
[hadoop@cu2 oozie-4.2.0]$ ~/hadoop-2.7.1/bin/hadoop fs -rmr share
[hadoop@cu2 oozie-4.2.0]$ ~/hadoop-2.7.1/bin/hadoop fs -put share share
[hadoop@cu2 oozie-4.2.0]$ tar zxvf oozie-examples.tar.gz 
[hadoop@cu2 oozie-4.2.0]$ ~/hadoop-2.7.1/bin/hadoop fs -put examples examples

修改share后重启下oozie,sharelib在应用中会缓冲,中间上传程序不能识别,会报`Could not locate Oozie sharelib`的错。

[hadoop@cu2 oozie-4.2.0]$ vi examples/apps/map-reduce/job.properties 
nameNode=hdfs://hadoop-master2:9000
jobTracker=hadoop-master2:8032
queueName=default
examplesRoot=examples

oozie.wf.application.path=${nameNode}/user/${user.name}/${examplesRoot}/apps/map-reduce/workflow.xml
outputDir=map-reduce

[hadoop@cu2 oozie-4.2.0]$ bin/oozie job -oozie http://localhost:11000/oozie -config examples/apps/map-reduce/job.properties -run
Error: E0501 : E0501: Could not perform authorization operation, User: hadoop is not allowed to impersonate hadoop

[hadoop@cu2 hadoop-2.7.1]$ vi etc/hadoop/core-site.xml 
<property>
<name>hadoop.proxyuser.hadoop.hosts</name><value>*</value>
</property>

<property>
<name>hadoop.proxyuser.hadoop.groups</name><value>*</value>
</property>

[hadoop@cu2 ~]$ for h in `cat /etc/hosts | grep slaver | awk '{print $2}' ` ; do rsync -vaz hadoop-2.7.1 $h:~/ --exclude=logs ; done

同步重启集群

注:增加以上配置后,无需重启集群,可以直接用hadoop管理员账号重新加载这两个属性值,命令为:
    hdfs dfsadmin -refreshSuperUserGroupsConfiguration
    yarn rmadmin -refreshSuperUserGroupsConfiguration

[hadoop@cu2 oozie-4.2.0]$ bin/oozie job -oozie http://localhost:11000/oozie -config examples/apps/map-reduce/job.properties -run
job: 0000000-150908082015741-oozie-hado-W

[hadoop@cu2 hadoop-2.7.1]$ bin/hadoop fs -cat /user/hadoop/examples/output-data/map-reduce/part-00000

尽管能看到结果了,但是不算任务执行成功。任务是有报错的`JA006: Call From cu2/192.168.0.214 to hadoop-master2:10020 failed on connection exception`

[hadoop@cu2 hadoop-2.7.1]$ sbin/mr-jobhistory-daemon.sh start historyserver

在运行一次就ok了。

参考

–END

安装http代理服务器squid

环境说明

  • squid-3.3.14.tar.gz
  • centos6.6

安装

1
2
3
4
5
6
7
8
9
10
11
yum install gcc gcc-c++
cd squid-3.3.14
./configure
make
make install

cd /usr/local/squid
#不修改会有权限的问题
chmod 777 var/logs
sbin/squid 
sbin/squid -k shutdown

或者:

1
2
yum -y install squid
chkconfig squid on

改下squid.conf的配置:

1
2
3
# And finally deny all other access to this proxy
#http_access deny all
http_access allow all

使用

在浏览器中设置Http代理。端口为3128

参考

–END

Supervisor安装配置

2019-7-27

1
2
3
4
5
6
7
8
9
10
11
12
13
14
15
16
17
18
19
20
21
22
23
24
25
26
27
28
29
30
31
32
33
34
35
36
37
38
39
40
41
42
43
44
45
46
47
48
49
50
51
52
53
54
55
56
57
58
59
60
61
62
63
64
65
66
67
68
69
70
71
72
73
74
75
76
77
78
79
yum install epel-release

yum install python-pip
# OR
#yum install python-setuptools
#easy_install pip

pip --version

# Python3
#yum search pip | grep python3
#pip3 -V

[root@node ~]# pip install supervisor
Collecting supervisor
  Downloading https://files.pythonhosted.org/packages/a5/27/03ee384818f4fc5f678743bb20ac49c5b4fc9f531bd404dec4b61a8b5d42/supervisor-4.0.4-py2.py3-none-any.whl (296kB)
    100% |████████████████████████████████| 307kB 78kB/s 
Collecting meld3>=1.0.0 (from supervisor)
  Downloading https://files.pythonhosted.org/packages/b6/ae/e6d731e4b9661642c1b20591d8054855bb5b8281cbfa18f561c2edd783f7/meld3-1.0.2-py2.py3-none-any.whl
Installing collected packages: meld3, supervisor
Successfully installed meld3-1.0.2 supervisor-4.0.4

#http://supervisord.org/installing.html#creating-a-configuration-file
echo_supervisord_conf > /etc/supervisord.conf
mkdir /etc/supervisord.d/ 

vi /etc/supervisord.conf
[inet_http_server]
port=*:9001
username=test
password=111111

[supervisord]
logfile=/var/log/supervisor/supervisord.log ; main log file; default $CWD/supervisord.log
logfile_maxbytes=50MB        ; max main logfile bytes b4 rotation; default 50MB
logfile_backups=10           ; # of main logfile backups; 0 means none, default 10
loglevel=info                ; log level; default info; others: debug,warn,trace
pidfile=/var/run/supervisord.pid ; supervisord pidfile; default supervisord.pid
nodaemon=false               ; start in foreground if true; default false
minfds=1024                  ; min. avail startup file descriptors; default 1024
minprocs=200                 ; min. avail process descriptors;default 200

[include]
files = /etc/supervisord.d/*.conf

#http://supervisord.org/running.html#running
supervisord -c /etc/supervisord.conf

lsof -i:9001

vi /etc/supervisord.d/crawler.conf
[program:crawler]
command=java -Dspring.profiles.active=crawlerproxypro -Dnode.id=local-1 -jar weibo-crawler-1.0-boot.jar
directory=/root/weibo                          ; 执行前要不要先cd到目录去,一般不用
priority=1                                     ; 数字越高,优先级越高
numprocs=1                                     ; 启动几个进程
autostart=true                                 ; 随着supervisord的启动而启动
autorestart=unexpected                         ; 自动重启。。当然要选上了
startretries=3                                ; 启动失败时的最多重试次数
exitcodes=0                                    ; 正常退出代码(是说退出代码是这个时就不再重启了吗?待确定)
stopsignal=KILL                                ; 用来杀死进程的信号
stopwaitsecs=10                                ; 发送SIGKILL前的等待时间
redirect_stderr=true                           ; 重定向stderr到stdout
stdout_logfile = /var/log/supervisor/%(program_name)s_%(process_num)02d.log
stderr_logfile = /var/log/supervisor/crawler-stderr.log
loglevel=error ; http://supervisord.org/logging.html#activity-log-levels
stdout_logfile_maxbytes=0
; stderr_logfile=/dev/stderr
stderr_logfile_maxbytes=0
; command = sh -c "sleep 5;date >>/root/test.ts"

supervisorctl reload
# OR
#supervisorctl -c /etc/supervisord.conf

wget https://raw.githubusercontent.com/Supervisor/initscripts/master/centos-systemd-etcs -O /usr/lib/systemd/system/systemd-supervisor.service

systemctl enable supervisord.service
systemctl start supervisord.service

2017

supervisor使用ini的方式配置其实挺讨厌的,但有一点好的就是它不需要配置为boot进程(process id 1)。

在线安装

下载 https://pypi.python.org/pypi/supervisor ,并安装:

1
2
3
4
5
6
7
8
9
10
11
12
13
14
15
16
17
18
19
20
21
22
23
24
25
26
27
28
29
30
31
32
33
34
35
36
37
38
39
40
# yum的supervisor版本太低(2.1)了,使用tar.gz源码来安装
[root@cu2 supervisor-3.2.3]# yum list supervisor
Loaded plugins: fastestmirror, priorities
Loading mirror speeds from cached hostfile
 * epel: ftp.cuhk.edu.hk
Available Packages
supervisor.noarch                                                                              2.1-9.el6                                                                               epel


# 不支持python3,安装之前先保证安装有python2.4+
[root@cu2 ~]# python --version
Python 2.6.6
[root@cu2 ~]# cd supervisor-3.2.3/
[root@cu2 supervisor-3.2.3]# python setup.py install
...
creating dist
creating 'dist/supervisor-3.2.3-py2.6.egg' and adding 'build/bdist.linux-x86_64/egg' to it
removing 'build/bdist.linux-x86_64/egg' (and everything under it)
Processing supervisor-3.2.3-py2.6.egg
creating /usr/lib/python2.6/site-packages/supervisor-3.2.3-py2.6.egg
Extracting supervisor-3.2.3-py2.6.egg to /usr/lib/python2.6/site-packages
Adding supervisor 3.2.3 to easy-install.pth file
Installing echo_supervisord_conf script to /usr/bin
Installing pidproxy script to /usr/bin
Installing supervisorctl script to /usr/bin
Installing supervisord script to /usr/bin

Installed /usr/lib/python2.6/site-packages/supervisor-3.2.3-py2.6.egg
Processing dependencies for supervisor==3.2.3
Searching for meld3>=0.6.5
Reading http://pypi.python.org/simple/meld3/
Best match: meld3 1.0.2
Downloading https://pypi.python.org/packages/45/a0/317c6422b26c12fe0161e936fc35f36552069ba8e6f7ecbd99bbffe32a5f/meld3-1.0.2.tar.gz#md5=3ccc78cd79cffd63a751ad7684c02c91
Processing meld3-1.0.2.tar.gz
Running meld3-1.0.2/setup.py -q bdist_egg --dist-dir /tmp/easy_install-nMSEmq/meld3-1.0.2/egg-dist-tmp-vkwrOp
zip_safe flag not set; analyzing archive contents...
Adding meld3 1.0.2 to easy-install.pth file

Installed /usr/lib/python2.6/site-packages/meld3-1.0.2-py2.6.egg
Finished processing dependencies for supervisor==3.2.3

(离线安装)下载依赖以及安装包,并安装

安装官网的版本下载: Installing To A System Without Internet Access

1
2
3
4
5
6
7
8
9
10
11
12
13
14
15
16
17
python -V

tar zxvf setuptools-18.2.tar.gz 
cd setuptools-18.2
python setup.py install

tar zxvf meld3-0.6.5.tar.gz 
cd meld3-0.6.5
python setup.py install

tar zxvf elementtree-1.2.6-20050316.tar.gz 
cd elementtree-1.2.6-20050316
python setup.py install

tar zxvf supervisor-3.1.3.tar.gz 
cd supervisor-3.1.3
python setup.py  install

启动

1
2
3
4
5
6
7
8
9
10
11
12
13
14
15
16
17
18
19
20
21
22
23
24
# http://supervisord.org/installing.html#creating-a-configuration-file
[root@cu2 supervisor-3.2.3]# echo_supervisord_conf >/etc/supervisord.conf
[root@cu2 supervisor-3.2.3]# supervisord
/usr/lib/python2.6/site-packages/supervisor-3.2.3-py2.6.egg/supervisor/options.py:296: UserWarning: Supervisord is running as root and it is searching for its configuration file in default locations (including its current working directory); you probably want to specify a "-c" argument specifying an absolute path to a configuration file for improved security.
  'Supervisord is running as root and it is searching '

[root@cu2 supervisor-3.2.3]# ps aux | grep supervisor | grep -v grep
root     63599  0.0  0.1 196600 10404 ?        Ss   16:57   0:00 /usr/bin/python /usr/bin/supervisord

[root@cu2 supervisor-3.2.3]# supervisorctl 
supervisor> help

default commands (type help <topic>):
=====================================
add    exit      open  reload  restart   start   tail   
avail  fg        pid   remove  shutdown  status  update 
clear  maintail  quit  reread  signal    stop    version

supervisor> pid
63599
supervisor> shutdown
Really shut the remote supervisord process down y/N? y
Shut down
supervisor> exit

ctl命令查看状态:

  • reread: Reload the daemon’s configuration files
  • update: Reload config and add/remove as necessary
  • reload: Restart the remote supervisord.
  • pid: supervisord的进程号
  • status: Get all process status info
  • avail: Display all configured processes

网页管理:

配置

http://supervisord.org/configuration.html

默认server(supervisord)-client(supervisorctl)通过 unix domain socket 文件的方式来通信,为了方便网页查看同时开启web配置 inet_http_server

program区域的配置要细读,主要配置工作都在这个上面。被管理的程序 不能后台运行 (例如:java程序不要加 nohup 以及 & )!!

Controlled programs should themselves not be daemons, as supervisord assumes it is responsible for daemonizing its subprocesses

1
2
3
4
5
6
7
8
9
10
11
12
13
14
15
16
17
18
19
20
21
22
23
24
25
26
27
28
29
30
31
32
33
34
35
36
37
38
39
40
41
42
43
44
45
46
47
48
49
[root@cu2 supervisor-3.2.3]# vi /etc/supervisord.conf 
...
[inet_http_server]         ; inet (TCP) server disabled by default
port=0.0.0.0:9001        ; (ip_address:port specifier, *:port for all iface)
...
[include]
files = /etc/supervisord.d/*.ini


[root@cu2 ~]# cat /etc/supervisord.d/redis.ini
[program:redis]
command=/home/hadoop/redis/bin/redis-server /home/hadoop/redis/redis.conf --port 1637%(process_num)01d
process_name=%(program_name)s_1637%(process_num)01d
numprocs=4
numprocs_start=0
priority=1
autostart=true
startsecs=0
startretries=3
autorestart=true
directory=/home/hadoop/redis

[root@cu2 ~]# supervisorctl shutdown
Shut down
[root@cu2 ~]# 
[root@cu2 ~]# supervisord

[root@cu2 ~]# ps aux | grep redis
root     50458  0.1  0.0 137444  2384 ?        Sl   18:14   0:00 /home/hadoop/redis/bin/redis-server *:16372                                   
root     50460  0.0  0.0 137444  2380 ?        Sl   18:14   0:00 /home/hadoop/redis/bin/redis-server *:16373                                   
root     50461  0.0  0.0 137444  2384 ?        Sl   18:14   0:00 /home/hadoop/redis/bin/redis-server *:16370                                   
root     50462  0.1  0.0 137444  2388 ?        Sl   18:14   0:00 /home/hadoop/redis/bin/redis-server *:16371                                   
root     51853  0.0  0.0 103248   888 pts/2    S+   18:14   0:00 grep redis

# 测试:随便kill掉一个,再ps查看,进程没少,但是刚刚kill掉的redis-server进程号变了

# 可以通过supervisord.log查看启动的日志。默认在/tmp下面
[root@cu2 tmp]# less supervisord.log 

# 如果在 配置program块 没有指定stdout和stderr的位置,可以在/tmp下找到对应的日志文件:
[root@cu2 tmp]# ll | grep redis
-rw------- 1 root   root      0 May  2 18:14 redis_16370-stderr---supervisor-pZ5pzl.log
-rw------- 1 root   root   2649 May  2 18:17 redis_16370-stdout---supervisor-GyrHYw.log
-rw------- 1 root   root      0 May  2 18:14 redis_16371-stderr---supervisor-XfyvMv.log
-rw------- 1 root   root   5298 May  2 18:20 redis_16371-stdout---supervisor-NOmTQJ.log
-rw------- 1 root   root      0 May  2 18:14 redis_16372-stderr---supervisor-SHMEi3.log
-rw------- 1 root   root   4967 May  2 18:19 redis_16372-stdout---supervisor-fvKDa8.log
-rw------- 1 root   root      0 May  2 18:14 redis_16373-stderr---supervisor-ncUWuE.log
-rw------- 1 root   root   2326 May  2 18:14 redis_16373-stdout---supervisor-ZxiqIj.log

supervisor服务

1
2
3
4
5
6
7
8
9
10
# 调整下启动脚本 start方法 中 --pidfile 的位置
[root@cu2 ~]# ll /etc/init.d/supervisord 
-rwxr-xr-x 1 root root 2977 May  2 19:29 /etc/init.d/supervisord
[root@cu2 ~]# grep daemon /etc/init.d/supervisord 
    daemon $supervisord --pidfile=${pidfile} $OPTIONS
[root@cu2 ~]# ll /etc/sysconfig/supervisord 
-rw-r--r-- 1 root root 723 May  2 19:17 /etc/sysconfig/supervisord

[root@cu2 ~]# service supervisord status
supervisord (pid  39549) is running...

参考

阿里云机器上安装supervisor - 2017-8-14 10:14:59

1
2
3
4
5
6
7
8
9
10
11
12
13
14
15
16
17
18
19
20
21
22
23
24
25
26
27
[root@iZ9416vn227Z opt]# easy_install supervisor
Searching for supervisor
Reading http://mirrors.aliyun.com/pypi/simple/supervisor/
Best match: supervisor 3.3.3
Downloading http://mirrors.aliyun.com/pypi/packages/31/7e/788fc6566211e77c395ea272058eb71299c65cc5e55b6214d479c6c2ec9a/supervisor-3.3.3.tar.gz#md5=0fe86dfec4e5c5d98324d24c4cf944bd
Processing supervisor-3.3.3.tar.gz
Running supervisor-3.3.3/setup.py -q bdist_egg --dist-dir /tmp/easy_install-vHf1qL/supervisor-3.3.3/egg-dist-tmp-eIOT5x
warning: no previously-included files matching '*' found under directory 'docs/.build'
Adding supervisor 3.3.3 to easy-install.pth file
Installing echo_supervisord_conf script to /usr/bin
Installing pidproxy script to /usr/bin
Installing supervisorctl script to /usr/bin
Installing supervisord script to /usr/bin

Installed /usr/lib/python2.6/site-packages/supervisor-3.3.3-py2.6.egg
Processing dependencies for supervisor
Searching for meld3>=0.6.5
Reading http://mirrors.aliyun.com/pypi/simple/meld3/
Best match: meld3 1.0.2
Downloading http://mirrors.aliyun.com/pypi/packages/45/a0/317c6422b26c12fe0161e936fc35f36552069ba8e6f7ecbd99bbffe32a5f/meld3-1.0.2.tar.gz#md5=3ccc78cd79cffd63a751ad7684c02c91
Processing meld3-1.0.2.tar.gz
Running meld3-1.0.2/setup.py -q bdist_egg --dist-dir /tmp/easy_install-aIaH9E/meld3-1.0.2/egg-dist-tmp-iTyXOd
zip_safe flag not set; analyzing archive contents...
Adding meld3 1.0.2 to easy-install.pth file

Installed /usr/lib/python2.6/site-packages/meld3-1.0.2-py2.6.egg
Finished processing dependencies for supervisor

其他的安装方式参考官网文章:

生成配置文件: http://supervisord.org/installing.html#creating-a-configuration-file

you can place it in the current directory (echo_supervisord_conf > supervisord.conf) and start supervisord with the -c flag in order to specify the configuration file location. For example, supervisord -c supervisord.conf

1
2
3
4
5
6
7
8
9
[root@iZ9416vn227Z opt]# echo_supervisord_conf > /etc/supervisord.conf

[root@iZ9416vn227Z opt]# vi /etc/supervisord.conf 
inet_http_server

supervisord log/pid...

[include]
files = /etc/supervisor.d/*.ini

已服务的方式启动(centos6): http://supervisord.org/running.html#running-supervisord-automatically-on-startup

1
2
3
4
5
6
7
[root@iZ9416vn227Z opt]# wget https://raw.githubusercontent.com/Supervisor/initscripts/master/redhat-init-jkoppe -O /etc/init.d/supervisord 
[root@iZ9416vn227Z opt]# chmod +x /etc/init.d/supervisord 

[root@iZ9416vn227Z opt]# wget https://raw.githubusercontent.com/Supervisor/initscripts/master/redhat-sysconfig-jkoppe -O /etc/sysconfig/supervisord 

对比sshd的启动脚本,注释掉这句后,正常输出。不知道 env -i 什么时刻加的
#set -o nounset

编写配置管理服务:

1
2
3
4
5
6
7
8
[root@iZ9416vn227Z opt]# cat /etc/supervisor.d/tomcat-test.ini 
[program:tomcat-test]
command=/opt/apache-tomcat-8.0.26-test/bin/catalina.sh run
environment=JAVA_OPTS="-Xmx512m",JAVA_HOME=/usr/java/jdk1.8.0_92
directory=/opt/apache-tomcat-8.0.26-test
autostart=true
autorestart=true
# user=root 需要tomcat目录相关的权限,谨慎

command 字段设置的是后台守护应用的启动命令, 注意: 该命令必须是在前台执行的, 即会独占控制台, 否则会导致 supervisor 无法获得标准输出, 并失去进程的控制权.

1
2
3
4
5
supervisorctl status all
supervisorctl update
supervisorctl start tomcat-test

service supervisord status

–END