winse@DESKTOP-BR4MG38:~$ docker pull nvcr.io/nvidia/pytorch:23.07-py3
23.07-py3: Pulling from nvidia/pytorch
3153aa388d02: Pulling fs layer
...
ee3f0ae6e80f: Pull complete
d4528227b5b8: Pull complete
Digest: sha256:c53e8702a4ccb3f55235226dab29ef5d931a2a6d4d003ab47ca2e7e670f7922b
Status: Downloaded newer image for nvcr.io/nvidia/pytorch:23.07-py3
nvcr.io/nvidia/pytorch:23.07-py3

What's Next?
  1. Sign in to your Docker account → docker login
  2. View a summary of image vulnerabilities and recommendations → docker scout quickview nvcr.io/nvidia/pytorch:23.07-py3


winse@DESKTOP-BR4MG38:~$ docker run -it --gpus=all --rm nvcr.io/nvidia/pytorch:23.07-py3 nvidia-smi

=============
== PyTorch ==
=============

NVIDIA Release 23.07 (build 63867923)
PyTorch Version 2.1.0a0+b5021ba

Container image Copyright (c) 2023, NVIDIA CORPORATION & AFFILIATES. All rights reserved.

Copyright (c) 2014-2023 Facebook Inc.
Copyright (c) 2011-2014 Idiap Research Institute (Ronan Collobert)
Copyright (c) 2012-2014 Deepmind Technologies    (Koray Kavukcuoglu)
Copyright (c) 2011-2012 NEC Laboratories America (Koray Kavukcuoglu)
Copyright (c) 2011-2013 NYU                      (Clement Farabet)
Copyright (c) 2006-2010 NEC Laboratories America (Ronan Collobert, Leon Bottou, Iain Melvin, Jason Weston)
Copyright (c) 2006      Idiap Research Institute (Samy Bengio)
Copyright (c) 2001-2004 Idiap Research Institute (Ronan Collobert, Samy Bengio, Johnny Mariethoz)
Copyright (c) 2015      Google Inc.
Copyright (c) 2015      Yangqing Jia
Copyright (c) 2013-2016 The Caffe contributors
All rights reserved.

Various files include modifications (c) NVIDIA CORPORATION & AFFILIATES.  All rights reserved.

This container image and its contents are governed by the NVIDIA Deep Learning Container License.
By pulling and using the container, you accept the terms and conditions of this license:
https://developer.nvidia.com/ngc/nvidia-deep-learning-container-license

NOTE: The SHMEM allocation limit is set to the default of 64MB.  This may be
   insufficient for PyTorch.  NVIDIA recommends the use of the following flags:
   docker run --gpus all --ipc=host --ulimit memlock=-1 --ulimit stack=67108864 ...

Sat Jan 13 14:01:37 2024
+---------------------------------------------------------------------------------------+
| NVIDIA-SMI 535.146.01             Driver Version: 537.99       CUDA Version: 12.2     |
|-----------------------------------------+----------------------+----------------------+
| GPU  Name                 Persistence-M | Bus-Id        Disp.A | Volatile Uncorr. ECC |
| Fan  Temp   Perf          Pwr:Usage/Cap |         Memory-Usage | GPU-Util  Compute M. |
|                                         |                      |               MIG M. |
|=========================================+======================+======================|
|   0  Quadro T2000                   On  | 00000000:01:00.0  On |                  N/A |
| N/A   43C    P8               6W /  60W |    856MiB /  4096MiB |      9%      Default |
|                                         |                      |                  N/A |
+-----------------------------------------+----------------------+----------------------+

+---------------------------------------------------------------------------------------+
| Processes:                                                                            |
|  GPU   GI   CI        PID   Type   Process name                            GPU Memory |
|        ID   ID                                                             Usage      |
|=======================================================================================|
|    0   N/A  N/A        27      G   /Xwayland                                 N/A      |
|    0   N/A  N/A        41      G   /Xwayland                                 N/A      |
|    0   N/A  N/A        42      G   /Xwayland                                 N/A      |
+---------------------------------------------------------------------------------------+


winse@DESKTOP-BR4MG38:~$ docker run --rm --gpus all nvcr.io/nvidia/k8s/cuda-sample:nbody nbody -gpu -benchmark
Unable to find image 'nvcr.io/nvidia/k8s/cuda-sample:nbody' locally
nbody: Pulling from nvidia/k8s/cuda-sample
22c5ef60a68e: Pull complete
1939e4248814: Pull complete
548afb82c856: Pull complete
a424d45fd86f: Pull complete
207b64ab7ce6: Pull complete
f65423f1b49b: Pull complete
2b60900a3ea5: Pull complete
e9bff09d04df: Pull complete
edc14edf1b04: Pull complete
1f37f461c076: Pull complete
9026fb14bf88: Pull complete
Digest: sha256:59261e419d6d48a772aad5bb213f9f1588fcdb042b115ceb7166c89a51f03363
Status: Downloaded newer image for nvcr.io/nvidia/k8s/cuda-sample:nbody
Run "nbody -benchmark [-numbodies=<numBodies>]" to measure performance.
        -fullscreen       (run n-body simulation in fullscreen mode)
        -fp64             (use double precision floating point values for simulation)
        -hostmem          (stores simulation data in host memory)
        -benchmark        (run benchmark to measure performance)
        -numbodies=<N>    (number of bodies (>= 1) to run in simulation)
        -device=<d>       (where d=0,1,2.... for the CUDA device to use)
        -numdevices=<i>   (where i=(number of CUDA devices > 0) to use for simulation)
        -compare          (compares simulation results running once on the default GPU and once on the CPU)
        -cpu              (run n-body simulation on the CPU)
        -tipsy=<file.bin> (load a tipsy model file for simulation)

NOTE: The CUDA Samples are not meant for performance measurements. Results may vary when GPU Boost is enabled.

> Windowed mode
> Simulation data stored in video memory
> Single precision floating point simulation
> 1 Devices used for simulation
GPU Device 0: "Turing" with compute capability 7.5

> Compute 7.5 CUDA device: [Quadro T2000]
16384 bodies, total time for 10 iterations: 64.071 ms
= 41.897 billion interactions per second
= 837.937 single-precision GFLOP/s at 20 flops per interaction


#再跑一遍
winse@DESKTOP-BR4MG38:~$ docker run --rm --gpus all nvcr.io/nvidia/k8s/cuda-sample:nbody nbody -gpu -benchmark
Run "nbody -benchmark [-numbodies=<numBodies>]" to measure performance.
        -fullscreen       (run n-body simulation in fullscreen mode)
        -fp64             (use double precision floating point values for simulation)
        -hostmem          (stores simulation data in host memory)
        -benchmark        (run benchmark to measure performance)
        -numbodies=<N>    (number of bodies (>= 1) to run in simulation)
        -device=<d>       (where d=0,1,2.... for the CUDA device to use)
        -numdevices=<i>   (where i=(number of CUDA devices > 0) to use for simulation)
        -compare          (compares simulation results running once on the default GPU and once on the CPU)
        -cpu              (run n-body simulation on the CPU)
        -tipsy=<file.bin> (load a tipsy model file for simulation)

NOTE: The CUDA Samples are not meant for performance measurements. Results may vary when GPU Boost is enabled.

> Windowed mode
> Simulation data stored in video memory
> Single precision floating point simulation
> 1 Devices used for simulation
GPU Device 0: "Turing" with compute capability 7.5

> Compute 7.5 CUDA device: [Quadro T2000]
16384 bodies, total time for 10 iterations: 23.398 ms
= 114.724 billion interactions per second
= 2294.490 single-precision GFLOP/s at 20 flops per interaction
winse@DESKTOP-BR4MG38:ai$ mkdir miniconda3
winse@DESKTOP-BR4MG38:ai$ cd miniconda3/
winse@DESKTOP-BR4MG38:miniconda3$

winse@DESKTOP-BR4MG38:miniconda3$ bash miniconda.sh -b -u -p ~/miniconda3
PREFIX=/home/winse/miniconda3
Unpacking payload ...

Installing base environment...


Downloading and Extracting Packages:


Downloading and Extracting Packages:

Preparing transaction: done
Executing transaction: done
installation finished.

winse@DESKTOP-BR4MG38:miniconda3$ ~/miniconda3/bin/conda init bash
no change     /home/winse/miniconda3/condabin/conda
no change     /home/winse/miniconda3/bin/conda
no change     /home/winse/miniconda3/bin/conda-env
no change     /home/winse/miniconda3/bin/activate
no change     /home/winse/miniconda3/bin/deactivate
no change     /home/winse/miniconda3/etc/profile.d/conda.sh
no change     /home/winse/miniconda3/etc/fish/conf.d/conda.fish
no change     /home/winse/miniconda3/shell/condabin/Conda.psm1
no change     /home/winse/miniconda3/shell/condabin/conda-hook.ps1
no change     /home/winse/miniconda3/lib/python3.11/site-packages/xontrib/conda.xsh
no change     /home/winse/miniconda3/etc/profile.d/conda.csh
modified      /home/winse/.bashrc

==> For changes to take effect, close and re-open your current shell. <==
https://modelscope.cn/models/damo/nlp_xlmr_named-entity-recognition_viet-ecommerce-title/summary

(demo) winse@DESKTOP-BR4MG38:ai$ python
Python 3.8.18 | packaged by conda-forge | (default, Dec 23 2023, 17:21:28)
[GCC 12.3.0] on linux
Type "help", "copyright", "credits" or "license" for more information.
>>> from modelscope.pipelines import pipeline
2024-01-15 01:22:20,476 - modelscope - INFO - PyTorch version 1.11.0+cu113 Found.
2024-01-15 01:22:20,478 - modelscope - INFO - Loading ast index from /home/winse/.cache/modelscope/ast_indexer
2024-01-15 01:22:20,498 - modelscope - INFO - Loading done! Current index file version is 1.11.0, with md5 85336421feb1dc1ec9dde85ceee20f42 and a total number of 953 components indexed
>>> from modelscope.utils.constant import Tasks
>>> ner_pipeline = pipeline(Tasks.named_entity_recognition, 'damo/nlp_xlmr_named-entity-recognition_viet-ecommerce-title', model_revision='v1.0.1')
2024-01-15 01:22:28,618 - modelscope - INFO - initiate model from damo/nlp_xlmr_named-entity-recognition_viet-ecommerce-title
2024-01-15 01:22:28,620 - modelscope - INFO - initiate model from location damo/nlp_xlmr_named-entity-recognition_viet-ecommerce-title.
2024-01-15 01:22:28,630 - modelscope - INFO - initialize model from damo/nlp_xlmr_named-entity-recognition_viet-ecommerce-title
2024-01-15 01:22:30,945 - modelscope - INFO - head has no _keys_to_ignore_on_load_missing
2024-01-15 01:22:34,599 - modelscope - INFO - All model checkpoint weights were used when initializing ModelForTokenClassificationWithCRF.

2024-01-15 01:22:34,599 - modelscope - INFO - All the weights of ModelForTokenClassificationWithCRF were initialized from the model checkpoint If your task is similar to the task the model of the checkpoint was trained on, you can already use ModelForTokenClassificationWithCRF for predictions without further training.
>>> result = ner_pipeline('Nón vành dễ thương cho bé gái')
>>> print(result)
{'output': [{'type': 'product', 'start': 0, 'end': 8, 'prob': 0.98140895, 'span': 'Nón vành'}, {'type': 'style', 'start': 9, 'end': 18, 'prob': 0.99752563, 'span': 'dễ thương'}, {'type': 'consumer_group', 'start': 23, 'end': 29, 'prob': 0.99895895, 'span': 'bé gái'}]}
>>>
(demo) winse@DESKTOP-BR4MG38:ai$ python
Python 3.8.18 | packaged by conda-forge | (default, Dec 23 2023, 17:21:28)
[GCC 12.3.0] on linux
Type "help", "copyright", "credits" or "license" for more information.
>>> from modelscope.utils.constant import Tasks
2024-01-15 10:07:41,619 - modelscope - INFO - PyTorch version 1.11.0+cu113 Found.
2024-01-15 10:07:41,630 - modelscope - INFO - Loading ast index from /home/winse/.cache/modelscope/ast_indexer
2024-01-15 10:07:41,751 - modelscope - INFO - Loading done! Current index file version is 1.11.0, with md5 85336421feb1dc1ec9dde85ceee20f42 and a total number of 953 components indexed
>>> from modelscope.pipelines import pipeline
>>> import cv2
>>> pipe = pipeline(task=Tasks.text_to_image_synthesis, model='Fengshenbang/Taiyi-Stable-Diffusion-1B-Chinese-v0.1', model_revision='v1.0.0')
Loading pipeline components...:   0%|                                                          | 0/7 [00:00<?, ?it/s]
/home/winse/miniconda3/envs/demo/lib/python3.8/site-packages/transformers/models/clip/feature_extraction_clip.py:28:
FutureWarning: The class CLIPFeatureExtractor is deprecated and will be removed in version 5 of Transformers. Please use CLIPImageProcessor instead.
  warnings.warn(
Loading pipeline components...:  57%|████████████████████████████▌                     | 4/7 [00:32<00:23,  7.83s/it]
`text_config_dict` is provided which will be used to initialize `CLIPTextConfig`. The value `text_config["id2label"]` will be overriden.
`text_config_dict` is provided which will be used to initialize `CLIPTextConfig`. The value `text_config["bos_token_id"]` will be overriden.
`text_config_dict` is provided which will be used to initialize `CLIPTextConfig`. The value `text_config["eos_token_id"]` will be overriden.
Loading pipeline components...: 100%|██████████████████████████████████████████████████| 7/7 [03:23<00:00, 29.02s/it]
>>> prompt = '飞流直下三千尺,油画'
>>> output = pipe({'text': prompt})
/home/winse/miniconda3/envs/demo/lib/python3.8/site-packages/diffusers/pipelines/stable_diffusion/pipeline_stable_diffusion.py:889: FutureWarning: `callback_steps` is deprecated and will be removed in version 1.0.0. Passing `callback_steps` as an input argument to `__call__` is deprecated, consider using `callback_on_step_end`
  deprecate(
We strongly recommend passing in an `attention_mask` since your input_ids may be padded. See https://huggingface.co/docs/transformers/troubleshooting#incorrect-output-when-padding-tokens-arent-masked.
You may ignore this warning if your `pad_token_id` (0) is identical to the `bos_token_id` (0), `eos_token_id` (2), or the `sep_token_id` (None), and your input is not padded.
100%|██████████████████████████████████████████████████████████████████████████████| 50/50 [1:03:11<00:00, 75.83s/it]
>>> cv2.imwrite('result.png', output['output_imgs'][0])
True
>>>
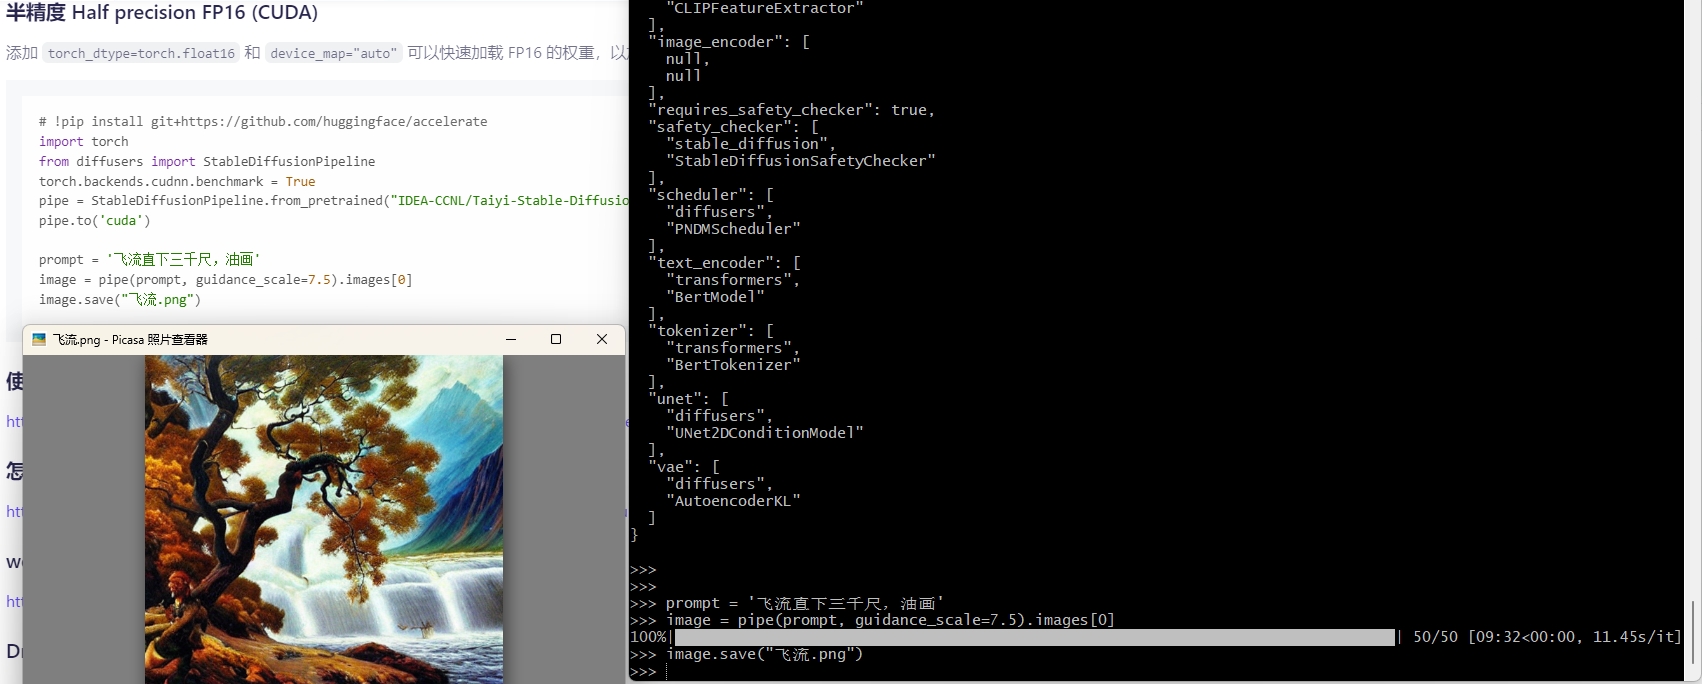
>>> import torch
>>> from diffusers import StableDiffusionPipeline
>>> torch.backends.cudnn.benchmark = True

>>> pipe = StableDiffusionPipeline.from_pretrained("Fengshenbang/Taiyi-Stable-Diffusion-1B-Chinese-v0.1", torch_dtype=torch.float16)
Loading pipeline components...:  57%|████████████████████████████▌                     | 4/7 [00:05<00:03,  1.32s/it]`text_config_dict` is provided which will be used to initialize `CLIPTextConfig`. The value `text_config["id2label"]` will be overriden.
`text_config_dict` is provided which will be used to initialize `CLIPTextConfig`. The value `text_config["bos_token_id"]` will be overriden.
`text_config_dict` is provided which will be used to initialize `CLIPTextConfig`. The value `text_config["eos_token_id"]` will be overriden.
Loading pipeline components...: 100%|██████████████████████████████████████████████████| 7/7 [00:32<00:00,  4.58s/it]
>>> pipe.to('cuda')
StableDiffusionPipeline {
  "_class_name": "StableDiffusionPipeline",
  "_diffusers_version": "0.25.0",
  "_name_or_path": "Fengshenbang/Taiyi-Stable-Diffusion-1B-Chinese-v0.1",
  "feature_extractor": [
    "transformers",
    "CLIPFeatureExtractor"
  ],
  "image_encoder": [
    null,
    null
  ],
  "requires_safety_checker": true,
  "safety_checker": [
    "stable_diffusion",
    "StableDiffusionSafetyChecker"
  ],
  "scheduler": [
    "diffusers",
    "PNDMScheduler"
  ],
  "text_encoder": [
    "transformers",
    "BertModel"
  ],
  "tokenizer": [
    "transformers",
    "BertTokenizer"
  ],
  "unet": [
    "diffusers",
    "UNet2DConditionModel"
  ],
  "vae": [
    "diffusers",
    "AutoencoderKL"
  ]
}

>>>
>>> prompt = '飞流直下三千尺,油画'
>>> image = pipe(prompt, guidance_scale=7.5).images[0]
100%|████████████████████████████████████████████████████████████████████████████████| 50/50 [09:32<00:00, 11.45s/it]
>>> image.save("飞流.png")
>>>
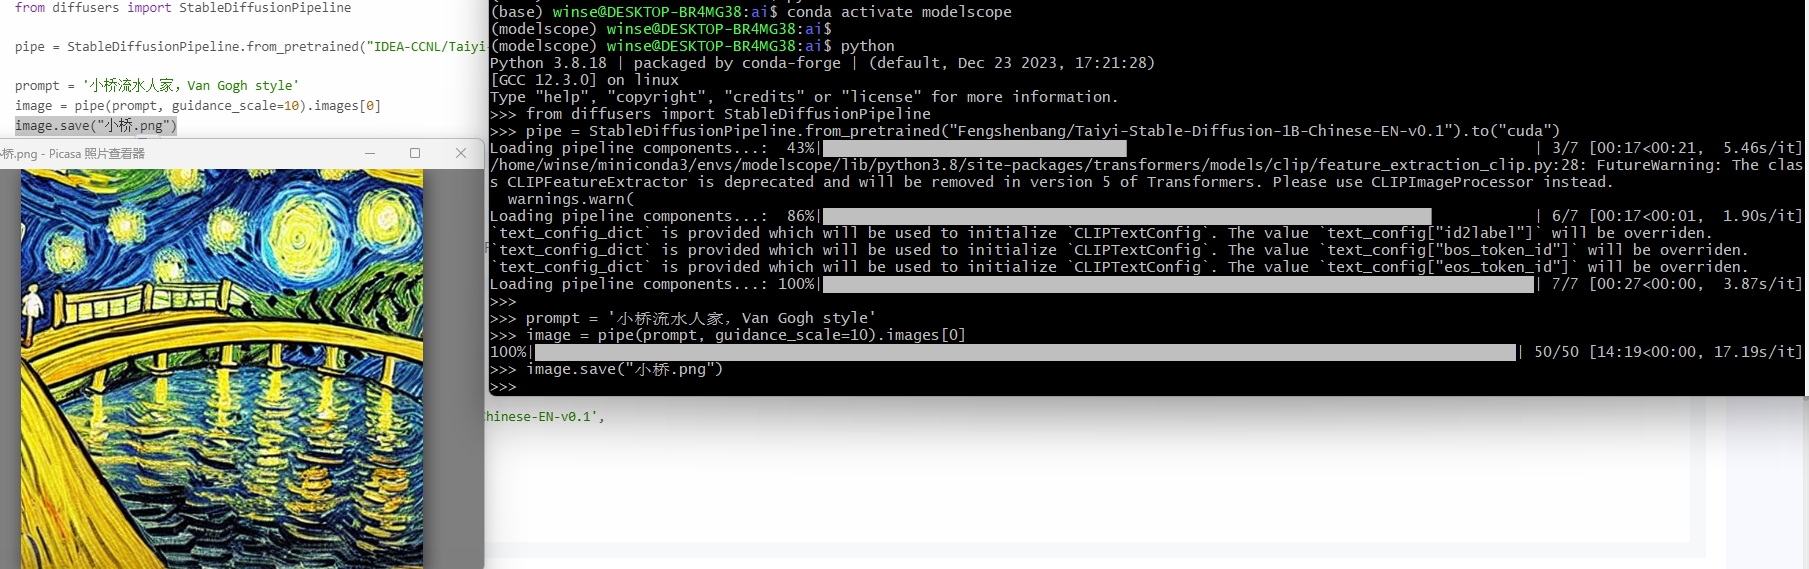
(base) winse@DESKTOP-BR4MG38:ai$ conda activate modelscope
(modelscope) winse@DESKTOP-BR4MG38:ai$
(modelscope) winse@DESKTOP-BR4MG38:ai$ python
Python 3.8.18 | packaged by conda-forge | (default, Dec 23 2023, 17:21:28)
[GCC 12.3.0] on linux
Type "help", "copyright", "credits" or "license" for more information.
>>> from diffusers import StableDiffusionPipeline
>>> pipe = StableDiffusionPipeline.from_pretrained("Fengshenbang/Taiyi-Stable-Diffusion-1B-Chinese-EN-v0.1").to("cuda")
Loading pipeline components...:  43%|█████████████████████████████████▊                                             | 3/7 [00:17<00:21,  5.46s/it]/home/winse/miniconda3/envs/modelscope/lib/python3.8/site-packages/transformers/models/clip/feature_extraction_clip.py:28: FutureWarning: The class CLIPFeatureExtractor is deprecated and will be removed in version 5 of Transformers. Please use CLIPImageProcessor instead.
  warnings.warn(
Loading pipeline components...:  86%|███████████████████████████████████████████████████████████████████▋           | 6/7 [00:17<00:01,  1.90s/it]`text_config_dict` is provided which will be used to initialize `CLIPTextConfig`. The value `text_config["id2label"]` will be overriden.
`text_config_dict` is provided which will be used to initialize `CLIPTextConfig`. The value `text_config["bos_token_id"]` will be overriden.
`text_config_dict` is provided which will be used to initialize `CLIPTextConfig`. The value `text_config["eos_token_id"]` will be overriden.
Loading pipeline components...: 100%|███████████████████████████████████████████████████████████████████████████████| 7/7 [00:27<00:00,  3.87s/it]
>>>
>>> prompt = '小桥流水人家,Van Gogh style'
>>> image = pipe(prompt, guidance_scale=10).images[0]
100%|█████████████████████████████████████████████████████████████████████████████████████████████████████████████| 50/50 [14:19<00:00, 17.19s/it]
>>> image.save("小桥.png")
>>>
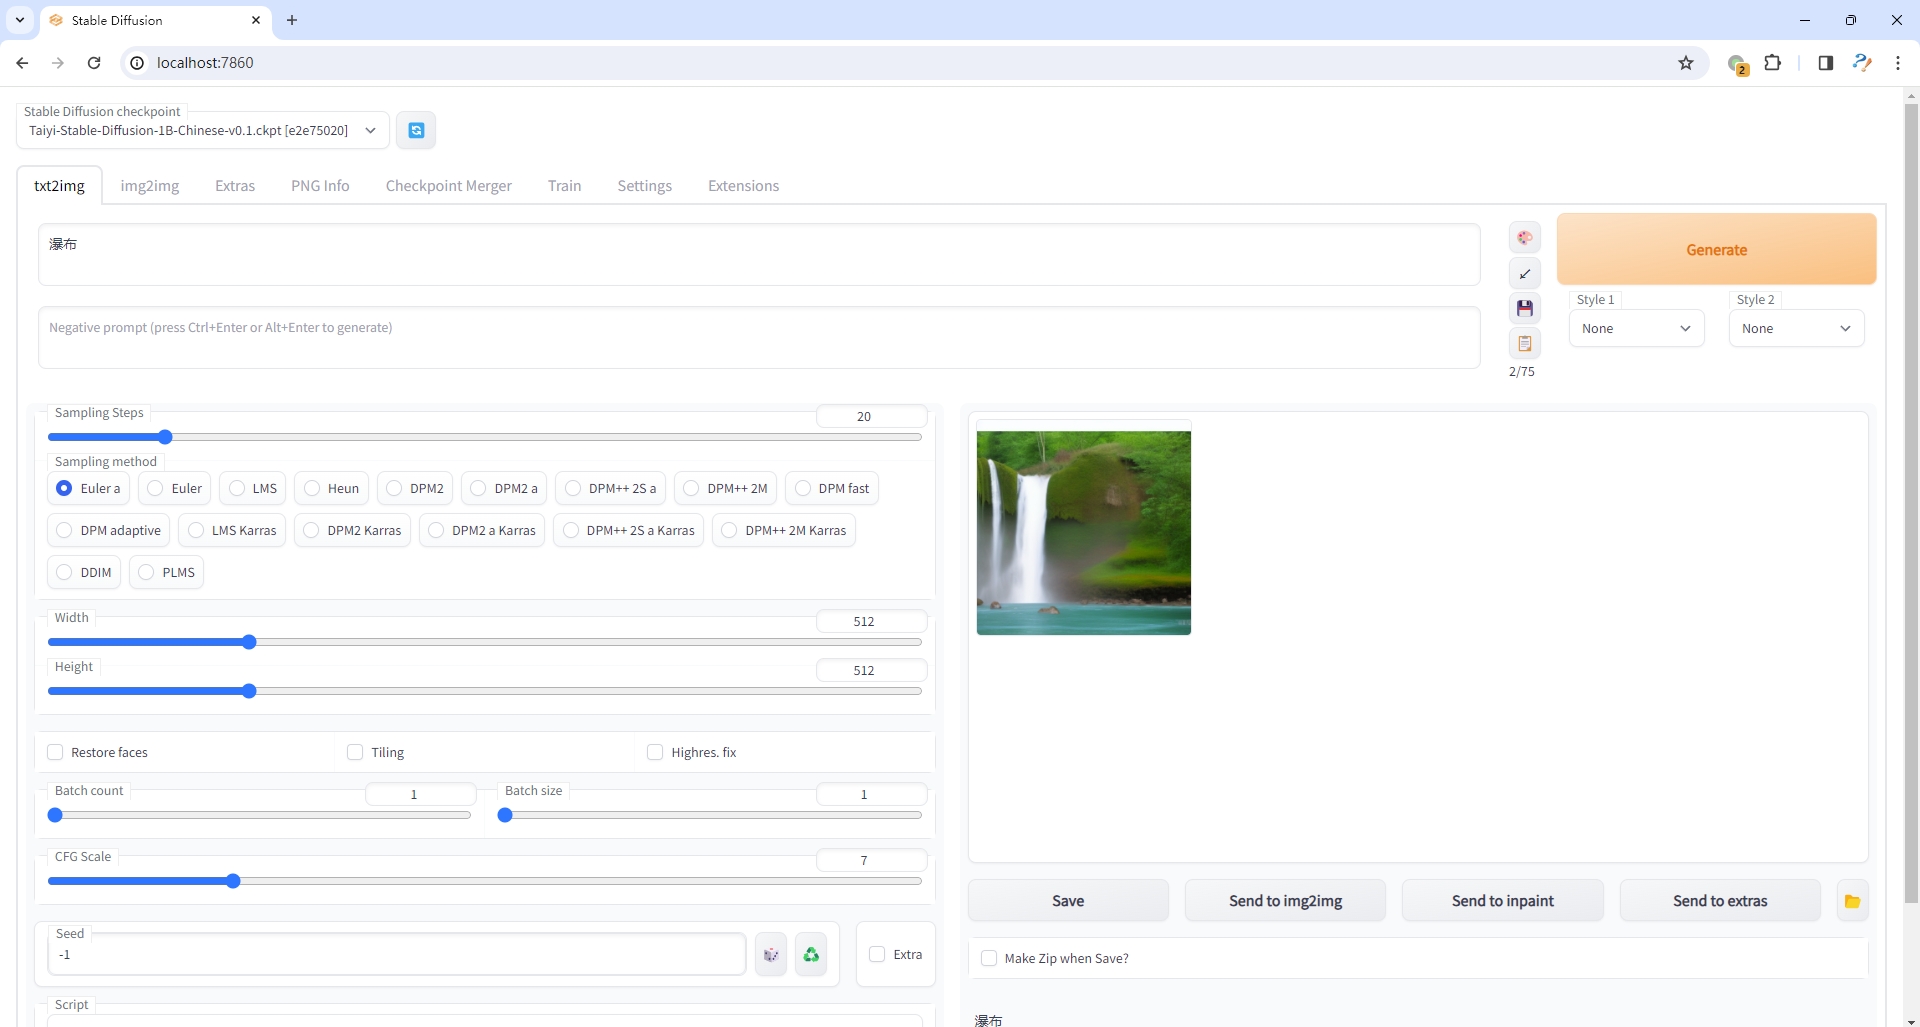
(modelscope) winse@DESKTOP-BR4MG38:P15$ docker run --rm --gpus all --ipc host --ulimit memlock=-1 --ulimit stack=67108864 -it -v /mnt/i/ai:/app/stabilityai -p 7860:7860 docker.io/nvidia/cuda:12.2.2-devel-ubuntu20.04


==========
== CUDA ==
==========

CUDA Version 12.2.2

Container image Copyright (c) 2016-2023, NVIDIA CORPORATION & AFFILIATES. All rights reserved.

This container image and its contents are governed by the NVIDIA Deep Learning Container License.
By pulling and using the container, you accept the terms and conditions of this license:
https://developer.nvidia.com/ngc/nvidia-deep-learning-container-license

A copy of this license is made available in this container at /NGC-DL-CONTAINER-LICENSE for your convenience.

root@41af85cb0007:/# nvidia-smi
Mon Jan 15 13:25:43 2024
+---------------------------------------------------------------------------------------+
| NVIDIA-SMI 535.146.01             Driver Version: 537.99       CUDA Version: 12.2     |
|-----------------------------------------+----------------------+----------------------+
| GPU  Name                 Persistence-M | Bus-Id        Disp.A | Volatile Uncorr. ECC |
| Fan  Temp   Perf          Pwr:Usage/Cap |         Memory-Usage | GPU-Util  Compute M. |
|                                         |                      |               MIG M. |
|=========================================+======================+======================|
|   0  Quadro T2000                   On  | 00000000:01:00.0  On |                  N/A |
| N/A   43C    P8               3W /  60W |    620MiB /  4096MiB |      2%      Default |
|                                         |                      |                  N/A |
+-----------------------------------------+----------------------+----------------------+

+---------------------------------------------------------------------------------------+
| Processes:                                                                            |
|  GPU   GI   CI        PID   Type   Process name                            GPU Memory |
|        ID   ID                                                             Usage      |
|=======================================================================================|
|  No running processes found                                                           |
+---------------------------------------------------------------------------------------+
root@41af85cb0007:/# docker ps -a
bash: docker: command not found
root@41af85cb0007:/# python -V
bash: python: command not found
root@1cd14c92899a:/var/lib/postgresql# docker ps
CONTAINER ID   IMAGE                        COMMAND                  CREATED        STATUS      PORTS                                 NAMES
458df7209e1b   sameersbn/redmine:3.4.6      "/sbin/entrypoint.sh…"   6 months ago   Up 2 days   443/tcp, 172.21.37.204:8081->80/tcp   redmine_redmine_1
884a04c9f985   sameersbn/postgresql:9.6-2   "/sbin/entrypoint.sh"    2 years ago    Up 2 days   5432/tcp                              redmine_postgresql_1

root@1cd14c92899a:/var/lib/postgresql# pg_dump -U postgres -Cc -d redmine_production >redmine.dump


# 把redmine-5.1的也导出来一份对照,把库里已有的数据保留,在旧sql里面去掉5存在的记录(不然导入报逐渐冲突导入失败的)。

# 配置数据导入,增加旧版本需要的字段。
ALTER TABLE projects
  ADD COLUMN customers_deploys_notifications_emails character varying,
  ADD COLUMN deploys_notifications_emails character varying,
  ADD COLUMN abbreviation character varying
  ;

ALTER TABLE trackers
  ADD COLUMN is_in_chlog boolean DEFAULT false NOT NULL
  ;

ALTER TABLE users
  ADD COLUMN identity_url character varying
  ;

删掉空的表和数据还原部分。把需要的,保留有数据的表。
数据库备份处理不好要重新做的话,要删除对应的文件内容,然后重启即可。
1234
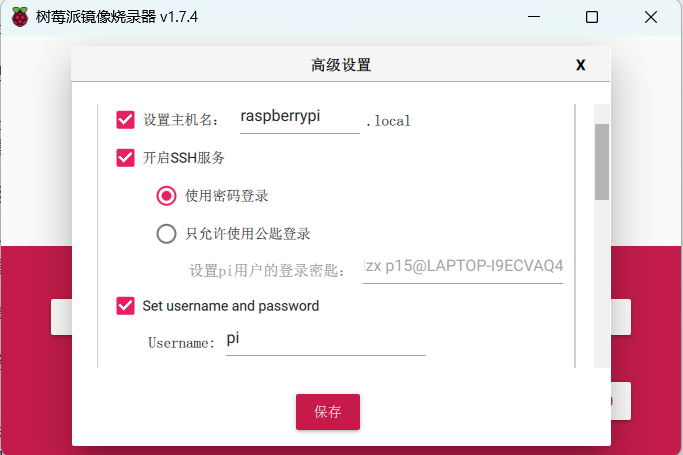
root@raspberrypi:~/docker-redmine-5.1.0# docker-compose down
root@raspberrypi:~/docker-redmine-5.1.0# rm -rf /srv/docker/redmine

root@raspberrypi:~/docker-redmine-5.1.0# docker-compose up
图片附件解压文件
1
root@raspberrypi:/# tar zxvf srv-docker-redmine.tar.gz /srv/docker/redmine/redmine/files
1
$ eval "$(conda shell.bash activate)"
$ conda shell.bash activate mamba-poc

2
eval "$(conda shell.bash hook)"
conda activate <env-name>

3
#!/bin/bash
source /Users/yourname/anaconda/bin/activate your_env
python --version # example way to see that your virtual env loaded as expected

4
try using

source ~/anaconda3/etc/profile.d/conda.sh

and then do

conda activate pult

5
https://unix.stackexchange.com/questions/689163/launch-terminal-and-conda-activate-env-from-bash-script
# Just activate my conda
alias my_conda='source /home/$USER/anaconda3/bin/activate && conda activate MyPy38'

# Open Jupyter Notebook in my Env
alias my_jupn='source /home/$USER/anaconda3/bin/activate && conda activate MyPy38 && jupyter-notebook'

# Open Jupyter Lab in my Env
alias my_jupl='source /home/$USER/anaconda3/bin/activate && conda activate MyPy38 && jupyter-lab'

# Open Spyder in my Env
alias my_spyder='source /home/$USER/anaconda3/bin/activate && conda activate MyPy38 && spyder'
root@raspberrypi:~# apt install vim
Reading package lists... Done
Building dependency tree... Done
Reading state information... Done
  libgpm2 vim-runtime
Suggested packages:
  gpm ctags vim-doc vim-scripts
The following NEW packages will be installed:
  libgpm2 vim vim-runtime
0 upgraded, 3 newly installed, 0 to remove and 0 not upgraded.
...
update-alternatives: using /usr/bin/vim.basic to provide /usr/bin/vim (vim) in auto mode
update-alternatives: using /usr/bin/vim.basic to provide /usr/bin/vimdiff (vimdiff) in auto mode
update-alternatives: using /usr/bin/vim.basic to provide /usr/bin/rvim (rvim) in auto mode
update-alternatives: using /usr/bin/vim.basic to provide /usr/bin/rview (rview) in auto mode
update-alternatives: using /usr/bin/vim.basic to provide /usr/bin/vi (vi) in auto mode
update-alternatives: using /usr/bin/vim.basic to provide /usr/bin/view (view) in auto mode
update-alternatives: using /usr/bin/vim.basic to provide /usr/bin/ex (ex) in auto mode
Processing triggers for man-db (2.9.4-2) ...
Processing triggers for libc-bin (2.31-13+rpt2+rpi1+deb11u5) ...

root@raspberrypi:~# echo "set mouse-=a" >>~/.vimrc
root@raspberrypi:~# vim /etc/wpa_supplicant/wpa_supplicant.conf
root@raspberrypi:~#


root@raspberrypi:~# iwlist wlan0 scan

# 算一个加密的配置
root@raspberrypi:~# wpa_passphrase winse
# reading passphrase from stdin
xxx
network={
        ssid="winse"
        #psk="xxx"
        psk=xxx
}

root@raspberrypi:~# cat /etc/wpa_supplicant/wpa_supplicant.conf
country=CN
ctrl_interface=DIR=/var/run/wpa_supplicant GROUP=netdev
update_config=1

network={
        ssid="winse"
        #psk="xxx"
        psk=xxx
}


# 配置服务
pi@raspberrypi:~ $ cat /lib/systemd/system/wpa_supplicant.service
[Unit]
Description=WPA supplicant
Before=network.target
After=dbus.service
Wants=network.target
IgnoreOnIsolate=true

[Service]
#Type=dbus
#BusName=fi.w1.wpa_supplicant1
Type=forking
ExecStart=/sbin/wpa_supplicant -u -s -O /run/wpa_supplicant -c /etc/wpa_supplicant/wpa_supplicant.conf -i wlan0 -B -D wext
Restart=always

[Install]
WantedBy=multi-user.target
#Alias=dbus-fi.w1.wpa_supplicant1.service
pi@raspberrypi:~ $ cat /etc/systemd/system/dhclient.service
[Unit]
Description= DHCP Client
Before=network.target

[Service]
Type=forking
ExecStart=/sbin/dhclient wlan0 -v
ExecStop=/sbin/dhclient wlan0 -r
Restart=always

[Install]
WantedBy=multi-user.target
pi@raspberrypi:~ $

root@raspberrypi:~# systemctl daemon-reload

root@raspberrypi:~# systemctl stop NetworkManager
root@raspberrypi:~# systemctl enable wpa_supplicant.service
root@raspberrypi:~# systemctl enable dhclient.service
Created symlink /etc/systemd/system/multi-user.target.wants/dhclient.service → /etc/systemd/system/dhclient.service.
root@raspberrypi:~# ip link show wlan0
3: wlan0: <NO-CARRIER,BROADCAST,MULTICAST,UP> mtu 1500 qdisc mq state DOWN mode DEFAULT group default qlen 1000
  link/ether 00:5a:39:e1:4d:bb brd ff:ff:ff:ff:ff:ff
root@raspberrypi:~# ip link set wlan0 up
root@raspberrypi:~# ip link show wlan0
3: wlan0: <NO-CARRIER,BROADCAST,MULTICAST,UP> mtu 1500 qdisc mq state DOWN mode DEFAULT group default qlen 1000
  link/ether 00:5a:39:e1:4d:bb brd ff:ff:ff:ff:ff:ff
root@raspberrypi:~#
root@raspberrypi:~# iw wlan0 link
Not connected.

root@raspberrypi:~# ifconfig wlan0 down
root@raspberrypi:~# ifconfig wlan0 up
root@raspberrypi:~# ifconfig wlan0
wlan0: flags=4099<UP,BROADCAST,MULTICAST>  mtu 1500
      ether 00:5a:39:e1:4d:bb  txqueuelen 1000  (Ethernet)
      RX packets 0  bytes 0 (0.0 B)
      RX errors 0  dropped 0  overruns 0  frame 0
      TX packets 0  bytes 0 (0.0 B)
      TX errors 0  dropped 0 overruns 0  carrier 0  collisions 0
Auto Connect on Startup
To automatically connect to wireless network at boot time, we need to edit the wpa_supplicant.service file. It’s a good idea to copy the file from /lib/systemd/system/ directory to /etc/systemd/system/ directory, then edit it because we don’t want newer version of wpasupplicant to override our modifications.

sudo cp /lib/systemd/system/wpa_supplicant.service /etc/systemd/system/wpa_supplicant.service

sudo nano /etc/systemd/system/wpa_supplicant.service
Find the following line.

ExecStart=/sbin/wpa_supplicant -u -s -O /run/wpa_supplicant
Change it to the following. Obviously you need to change wlp3s0 if that isn’t your interface name.

ExecStart=/sbin/wpa_supplicant -u -s -c /etc/wpa_supplicant.conf -i wlp3s0
It’s recommended to always try to restart wpa_supplicant when failure is detected. Add the following right below the ExecStart line.

Restart=always
If you can find the following line in this file, comment it out (Add the # character at the beginning of the line).

Alias=dbus-fi.w1.wpa_supplicant1.service
Save and close the file. Then enable wpa_supplicant service to start at boot time.

sudo systemctl enable wpa_supplicant.service

~~~

sudo nano /etc/systemd/system/dhclient.service
Put the following text into the file.

[Unit]
Description= DHCP Client
Before=network.target

[Service]
Type=forking
ExecStart=/sbin/dhclient wlp3s0 -v
ExecStop=/sbin/dhclient wlp3s0 -r
Restart=always

[Install]
WantedBy=multi-user.target
Save and close the file. Then enable this service.

sudo systemctl enable dhclient.service