Article
重新折腾raspberry2
买了新的raspberry4后,就没怎么去弄旧的树莓派2了,今天再次看到想着运行起来看看,插上电源后,一直亮着绿灯,然后就没其他反应了。
树莓派2有点旧,现在直接拿着新的手机充电器去接的时刻,一直起不来,刚开始是怀疑是用TTL接错线导致板子烧了,也没有显示器查看界面。
后面想着重新安装一下试试,然后拿着去接网线有线网络,这样就拿了一个旧的充电器的头。没想到这个时刻电源指示灯尽然闪起来了。想来这可能是电流过载保护了。
问题解决了,也把最新的重新安装的记录一下。
# 安装
参考:
# 安装系统
1 打开 Raspberry Pi Imager 下载并安装,然后把SD card插入电脑。

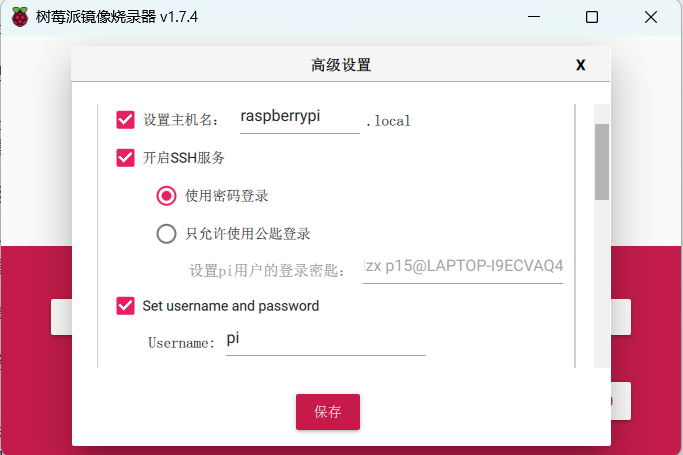
2 设置初始化 用户和密码,并默认打开ssh服务(新版本已经去掉默认用户了,所以要设置一下 An update to Raspberry Pi OS Bullseye )
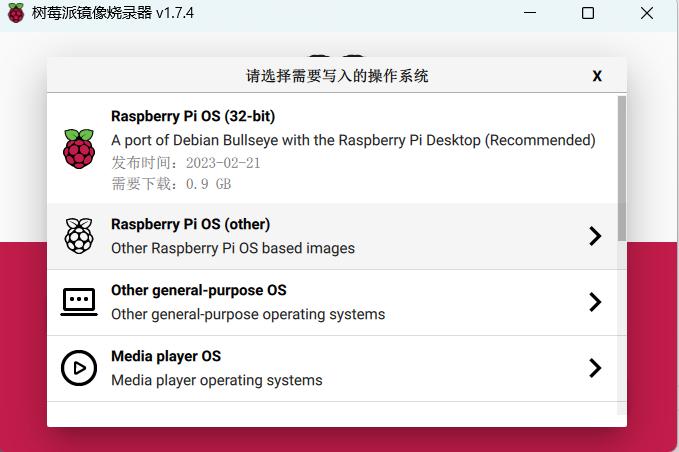
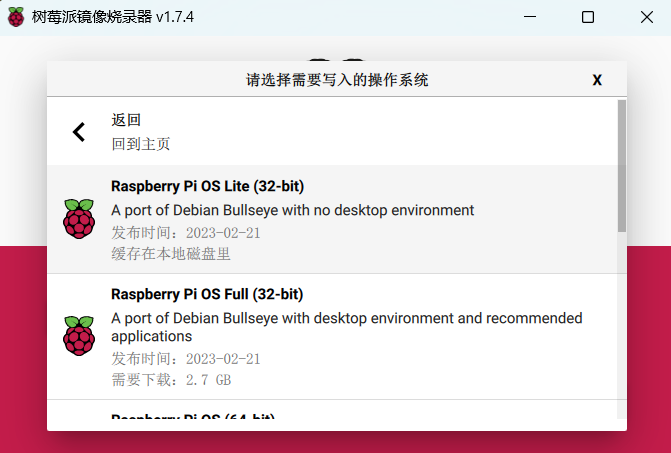
3 选择操作系统
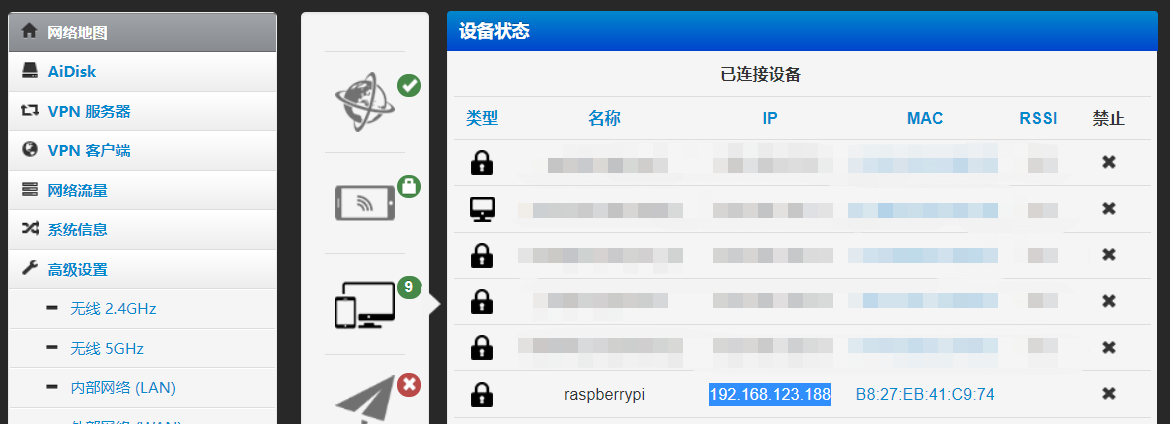
4 连上有线网络,接通电源。然后打开路由管理界面,查看raspberry的ip地址
5 用ssh连接服务器
# 配置Wifi网络
原来已经买了usb的无线网卡,用 ifconfig 也能查看到 wlan0 的接口。
root@raspberrypi:~# apt install vim
Reading package lists... Done
Building dependency tree... Done
Reading state information... Done
  libgpm2 vim-runtime
Suggested packages:
  gpm ctags vim-doc vim-scripts
The following NEW packages will be installed:
  libgpm2 vim vim-runtime
0 upgraded, 3 newly installed, 0 to remove and 0 not upgraded.
...
update-alternatives: using /usr/bin/vim.basic to provide /usr/bin/vim (vim) in auto mode
update-alternatives: using /usr/bin/vim.basic to provide /usr/bin/vimdiff (vimdiff) in auto mode
update-alternatives: using /usr/bin/vim.basic to provide /usr/bin/rvim (rvim) in auto mode
update-alternatives: using /usr/bin/vim.basic to provide /usr/bin/rview (rview) in auto mode
update-alternatives: using /usr/bin/vim.basic to provide /usr/bin/vi (vi) in auto mode
update-alternatives: using /usr/bin/vim.basic to provide /usr/bin/view (view) in auto mode
update-alternatives: using /usr/bin/vim.basic to provide /usr/bin/ex (ex) in auto mode
Processing triggers for man-db (2.9.4-2) ...
Processing triggers for libc-bin (2.31-13+rpt2+rpi1+deb11u5) ...

root@raspberrypi:~# echo "set mouse-=a" >>~/.vimrc
root@raspberrypi:~# vim /etc/wpa_supplicant/wpa_supplicant.conf
root@raspberrypi:~#

root@raspberrypi:~# iwlist wlan0 scan

# 算一个加密的配置
root@raspberrypi:~# wpa_passphrase winse
# reading passphrase from stdin
xxx
network={
        ssid="winse"
        #psk="xxx"
        psk=xxx
}

root@raspberrypi:~# cat /etc/wpa_supplicant/wpa_supplicant.conf
country=CN
ctrl_interface=DIR=/var/run/wpa_supplicant GROUP=netdev
update_config=1

network={
        ssid="winse"
        #psk="xxx"
        psk=xxx
}

# 配置服务
pi@raspberrypi:~ $ cat /lib/systemd/system/wpa_supplicant.service
[Unit]
Description=WPA supplicant
Before=network.target
After=dbus.service
Wants=network.target
IgnoreOnIsolate=true

[Service]
#Type=dbus
#BusName=fi.w1.wpa_supplicant1
Type=forking
ExecStart=/sbin/wpa_supplicant -u -s -O /run/wpa_supplicant -c /etc/wpa_supplicant/wpa_supplicant.conf -i wlan0 -B -D wext
Restart=always

[Install]
WantedBy=multi-user.target
#Alias=dbus-fi.w1.wpa_supplicant1.service
pi@raspberrypi:~ $ cat /etc/systemd/system/dhclient.service
[Unit]
Description= DHCP Client
Before=network.target

[Service]
Type=forking
ExecStart=/sbin/dhclient wlan0 -v
ExecStop=/sbin/dhclient wlan0 -r
Restart=always

[Install]
WantedBy=multi-user.target
pi@raspberrypi:~ $

root@raspberrypi:~# systemctl daemon-reload

root@raspberrypi:~# systemctl stop NetworkManager
root@raspberrypi:~# systemctl enable wpa_supplicant.service
root@raspberrypi:~# systemctl enable dhclient.service
Created symlink /etc/systemd/system/multi-user.target.wants/dhclient.service → /etc/systemd/system/dhclient.service.
配置好后,重启服务器,再次查看路由器管理web界面:

然后再把网线拔掉,再重启一次确认一下。
# 遇到的问题:
1 https://zhuanlan.zhihu.com/p/136463580
如果树莓派系统使用的是Raspbian Stretch,则ifup命令可能不起作用,可能会收到一条错误消息,
内容如下:“ ifdown:unknown interface wlan0 ”。可以使用以下任何命令来解决:
sudo ifconfig wlan0 up
2 https://shumeipai.nxez.com/2017/09/13/raspberry-pi-network-configuration-before-boot.html
说明以及不同安全性的 WiFi 配置示例:
#ssid:网络的ssid
#psk:密码
#priority:连接优先级,数字越大优先级越高(不可以是负数)
#scan_ssid:连接隐藏WiFi时需要指定该值为1

如果你的 WiFi 没有密码

network={
  ssid="你的无线网络名称(ssid)"
  key_mgmt=NONE
}
如果你的 WiFi 使用WEP加密

network={
  ssid="你的无线网络名称(ssid)"
  key_mgmt=NONE
  wep_key0="你的wifi密码"
}
如果你的 WiFi 使用WPA/WPA2加密

network={
  ssid="你的无线网络名称(ssid)"
  key_mgmt=WPA-PSK
  psk="你的wifi密码"
}

如果你不清楚 WiFi 的加密模式,可以在安卓手机上用 root explorer 打开 /data/misc/wifi/wpa/wpa_supplicant.conf,查看 WiFi 的信息。
3 https://www.labno3.com/2021/03/22/setting-up-raspberry-pi-wifi/
如果连接有问题,一定要确认Pi是否支持WiFi。也有可能你的SSID是错误的,要扫描和检查,
使用sudo iwlist wlan0 scan并检查essid字段。
这个字段应该和你在ssid字段输入的一样。
4 查看信息 https://www.baeldung.com/linux/connect-network-cli
root@raspberrypi:~# ip link show wlan0
3: wlan0: <NO-CARRIER,BROADCAST,MULTICAST,UP> mtu 1500 qdisc mq state DOWN mode DEFAULT group default qlen 1000
	link/ether 00:5a:39:e1:4d:bb brd ff:ff:ff:ff:ff:ff
root@raspberrypi:~# ip link set wlan0 up
root@raspberrypi:~# ip link show wlan0
3: wlan0: <NO-CARRIER,BROADCAST,MULTICAST,UP> mtu 1500 qdisc mq state DOWN mode DEFAULT group default qlen 1000
	link/ether 00:5a:39:e1:4d:bb brd ff:ff:ff:ff:ff:ff
root@raspberrypi:~#
root@raspberrypi:~# iw wlan0 link
Not connected.

root@raspberrypi:~# ifconfig wlan0 down
root@raspberrypi:~# ifconfig wlan0 up
root@raspberrypi:~# ifconfig wlan0
wlan0: flags=4099<UP,BROADCAST,MULTICAST>  mtu 1500
		ether 00:5a:39:e1:4d:bb  txqueuelen 1000  (Ethernet)
		RX packets 0  bytes 0 (0.0 B)
		RX errors 0  dropped 0  overruns 0  frame 0
		TX packets 0  bytes 0 (0.0 B)
		TX errors 0  dropped 0 overruns 0  carrier 0  collisions 0
5 https://shapeshed.com/linux-wifi/
wpa_cli
6 https://www.bilibili.com/read/cv8895717
vim /etc/wpa_supplicant/wpa_supplicant.conf 编辑该文件,在文件顶部增加以下内容
country=CN
ctrl_interface=/run/wpa_supplicant
update_config=1

特别说明:country=CN 由于各个国家wifi使用频段不同,尤其5G频段

vim /etc/rc.local 添加以下内容

#!/bin/bash

ip link set wlan0 up &
wpa_supplicant -B -i wlan0 -D nl80211 -c /etc/wpa_supplicant/wpa_supplicant.conf &
dhclient wlan0

exit 0
7 https://blog.csdn.net/u010049696/article/details/48765999
配置service。进入到/usr/lib/systemd/system目录,可以看到下面四个文件:

wpa_supplicant-nl80211@.service
wpa_supplicant.service
wpa_supplicant@.service
wpa_supplicant-wired@.service

编辑wpa_supplicant.service文件,如下:

[Unit]
Description=WPA supplicant

[Service]
Type=dbus
BusName=fi.epitest.hostap.WPASupplicant
ExecStart=/usr/bin/wpa_supplicant -c/etc/wpa_supplicant/test.conf -i wlp3s0

[Install]
WantedBy=multi-user.target
Alias=dbus-fi.epitest.hostap.WPASupplicant.service

其中,只需修改ExecStart=/usr/bin/wpa_supplicant -c/etc/wpa_supplicant/test.conf -i wlp3s0即可。
8 https://www.linuxbabe.com/command-line/ubuntu-server-16-04-wifi-wpa-supplicant
Auto Connect on Startup
To automatically connect to wireless network at boot time, we need to edit the wpa_supplicant.service file. It’s a good idea to copy the file from /lib/systemd/system/ directory to /etc/systemd/system/ directory, then edit it because we don’t want newer version of wpasupplicant to override our modifications.

sudo cp /lib/systemd/system/wpa_supplicant.service /etc/systemd/system/wpa_supplicant.service

sudo nano /etc/systemd/system/wpa_supplicant.service
Find the following line.

ExecStart=/sbin/wpa_supplicant -u -s -O /run/wpa_supplicant
Change it to the following. Obviously you need to change wlp3s0 if that isn’t your interface name.

ExecStart=/sbin/wpa_supplicant -u -s -c /etc/wpa_supplicant.conf -i wlp3s0
It’s recommended to always try to restart wpa_supplicant when failure is detected. Add the following right below the ExecStart line.

Restart=always
If you can find the following line in this file, comment it out (Add the # character at the beginning of the line).

Alias=dbus-fi.w1.wpa_supplicant1.service
Save and close the file. Then enable wpa_supplicant service to start at boot time.

sudo systemctl enable wpa_supplicant.service

~~~

sudo nano /etc/systemd/system/dhclient.service
Put the following text into the file.

[Unit]
Description= DHCP Client
Before=network.target

[Service]
Type=forking
ExecStart=/sbin/dhclient wlp3s0 -v
ExecStop=/sbin/dhclient wlp3s0 -r
Restart=always

[Install]
WantedBy=multi-user.target
Save and close the file. Then enable this service.

sudo systemctl enable dhclient.service
–END
Related
Related posts
-
笔记本电脑扩展出多个屏幕:Sunshine + Moonlight 实战记录
2026-03-19
-
树莓派内存不够用?加上虚拟内存,再给 OpenClaw 浏览网页加上“阅后即焚”的策略
2026-03-16
-
树莓派 OpenClaw Browser 看不见摸不着?给它配个 VNC 图形环境,踏实安心的Debug
2026-03-09
-
在树莓派 Ubuntu Server 上跑 OpenClaw Browser:Chromium 无头模式实战
2026-03-08