Article
Conjure实战:从零搭建前后端分离的RPC服务
上一篇简单介绍了 Conjure,感受了它使用 YAML模型和接口 生成代码的简单和高效。这篇基于 https://github.com/palantir/conjure-java-example 写一个完整BS的例子,展示自建服务如何用 Conjure 来简化提升。
官方提供的例子 conjure-java-example 是基于他们的体系(或者说生态)来构建的。如果要在自己的项目中使用,我们需要剥离出一个最小化的运行环境。
本文中用的工具以及版本:
- Java 11
- Gradle 8
- Node 20(windows用于Conjure生成代码,wsl用于编写React)
内容分为三块:1、搭建基本框架,2、基础框架运行,3、运行Conjure。可以结合需要跳转到对应的部分。
# 1、搭建基本框架
先把Conjure、SpringBoot以及React的基本框架搭建起来。使用AI来创建SpringBoot和React工程:
# Conjure
首先创建gradle工程,把Conjure结构创建出来。
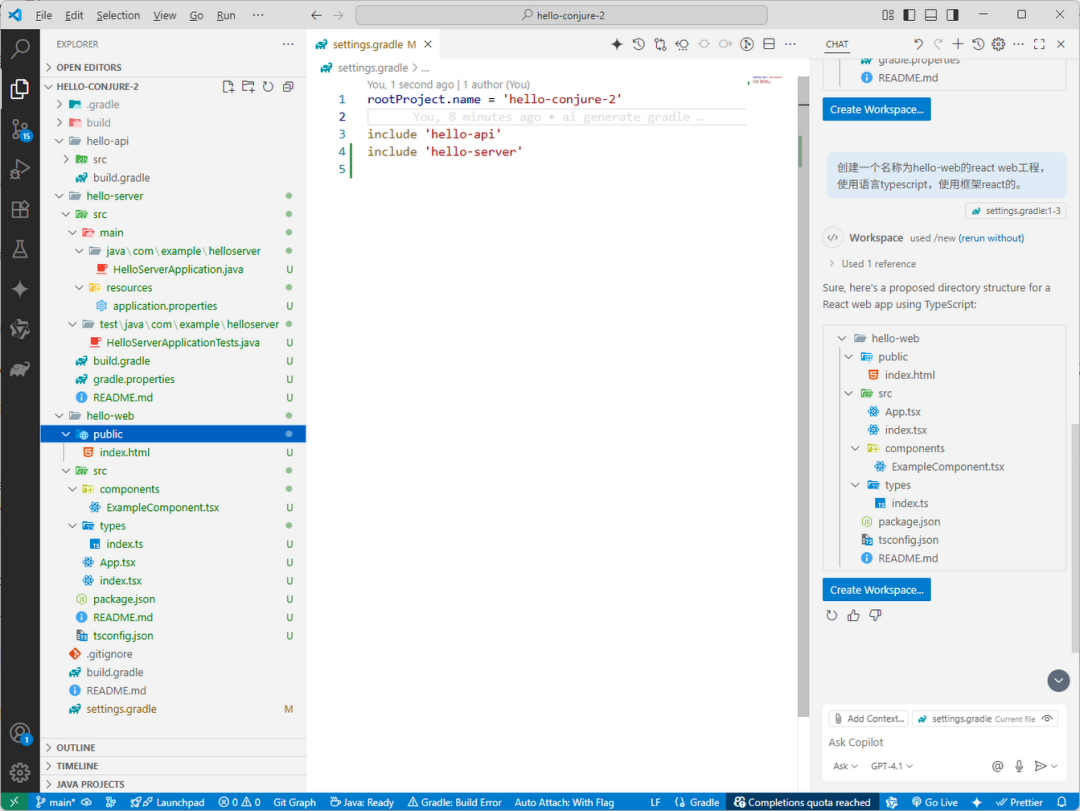
Prompt: 创建一个gradle的名字为hello-conjure-2的工程。新增子工程hello-api,在hello-api中添加src/main/conjure/hello.yml的文件。gradle配置保持最简单,只配置必须的配置。
这里先不修改。先把框架搭起来,后面再统一完善。
# SpringBoot
Prompt: 创建一个名为hello-server工程,使用jdk-11的springboot工程。sprintboot添加starter web,starter jersey的依赖。junit5依赖指定具体版本。使用本地的gradle,并且不需要settings.gradle文件。
# React
Prompt: 创建一个名称为hello-web的react web工程,使用语言typescript,使用框架react的。
完成后,把 hello-server 添加到 settings.gradle。目录结构如下:
# 2、跑起来:运行基础框架
# Conjure
根据上一篇文章中的配置修改Gradle:
settings.gradle
rootProject.name = 'hello-conjure-2'

include 'hello-api'
include 'hello-api:hello-api-objects'
include 'hello-api:hello-api-jersey'
include 'hello-api:hello-api-typescript'

include 'hello-server'
build.gradle
buildscript {
    repositories {
        mavenCentral()
    }

    dependencies {
        classpath'com.palantir.gradle.conjure:gradle-conjure:5.10.0'
    }
}

allprojects {
    repositories {
        mavenCentral()
    }
}

apply plugin: 'com.palantir.conjure'

// 需要定义在rootProject, 指定依赖的版本号
configurations {
    conjureCompiler
    conjureJava
    conjureTypeScript
}
dependencies {
    conjureCompiler 'com.palantir.conjure:conjure:4.16.1'
    conjureJava 'com.palantir.conjure.java:conjure-java:6.5.0'
    conjureTypeScript 'com.palantir.conjure.typescript:conjure-typescript:5.4.0'
}

subprojects {
    apply plugin: 'java-library'
    apply plugin: 'com.palantir.conjure'

    sourceCompatibility = 11
    targetCompatibility = 11

    compileJava { options.encoding = "UTF-8" }

    conjure {
        typescript { version = "0.0.1" }

        java { useImmutableBytes = true }
    }

    dependencies {
        implementation "com.palantir.conjure.java:conjure-lib:6.5.0"
    }
}
hello-api/build.gradle(空文件即可)
# SpringBoot
依然使用AI给 SprintBoot 添加hello接口。Prompt: 增加/hello的rest controller。并生成对应的test单元测试,使用springboottest写测试用例
HelloController.java
package com.example.helloserver;

import org.springframework.web.bind.annotation.GetMapping;
import org.springframework.web.bind.annotation.RestController;

@RestController
public class HelloController {

    @GetMapping("/hello")
    public String hello() {
        return "Hello, World!";
    }
}
HelloServerApplicationTests.java
package com.example.helloserver;

import static org.assertj.core.api.Assertions.assertThat;

import org.junit.jupiter.api.Test;
import org.springframework.beans.factory.annotation.Autowired;
import org.springframework.boot.test.context.SpringBootTest;
import org.springframework.boot.test.web.client.TestRestTemplate;
import org.springframework.boot.web.server.LocalServerPort;

@SpringBootTest(webEnvironment = SpringBootTest.WebEnvironment.RANDOM_PORT)
class HelloServerApplicationTests {
    @LocalServerPort
    private int port;

    @Autowired
    private TestRestTemplate restTemplate;

    @Test
    void helloEndpointReturnsHelloWorld() {
        String url ="http://localhost:" + port + "/hello";
        String response = restTemplate.getForObject(url, String.class);
        assertThat(response).isEqualTo("Hello, World!");
    }
}
运行完善后的 hello-server 的 build.gradle:
plugins {
    id 'org.springframework.boot' version '2.5.4'
    id 'io.spring.dependency-management' version '1.0.11.RELEASE'
    id 'java'
}


dependencies {
    implementation 'org.springframework.boot:spring-boot-starter-web'
    implementation 'org.springframework.boot:spring-boot-starter-jersey'

    testImplementation 'org.springframework.boot:spring-boot-starter-test'
    testImplementation platform('org.junit:junit-bom:5.10.2')
    testImplementation 'org.junit.jupiter:junit-jupiter'
    testRuntimeOnly 'org.junit.platform:junit-platform-launcher'
}

test {
    useJUnitPlatform()
}
# React web
修改 package.json 下 React 版本:
  "dependencies":{
    "conjure-client":"^2.15.0",
    "hello-api":"link:../hello-api/hello-api-typescript/src/",
    "react":"^17.0.2",
    "react-dom":"^17.0.2",
    "typescript":"^4.4.4"
},
"devDependencies":{
    "@types/react":"^17.0.2",
    "@types/react-dom":"^17.0.2",
    "react-scripts":"5.0.1"
},
使用Nodejs 20,并安装好依赖。
winse@DESKTOP-H3OHF4N:hello-web$ nvm use 20
Now using node v20.19.4 (npm v10.8.2)
winse@DESKTOP-H3OHF4N:hello-web$ yarn
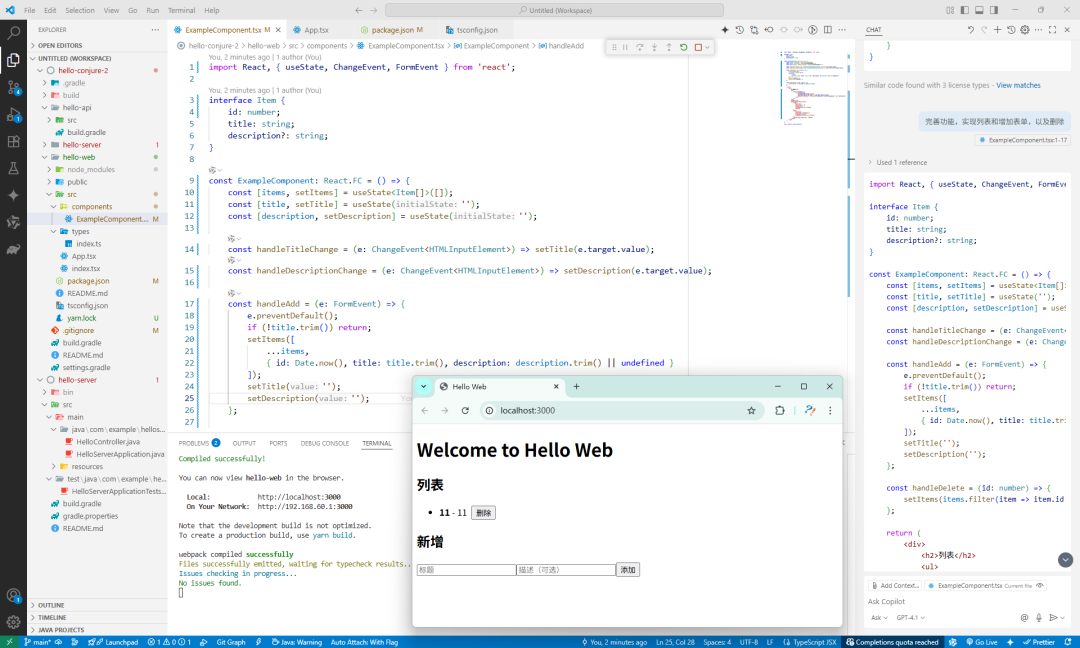
再使用AI给 example 增加加功能。选择example tsx,输入提示词Prompt:完善功能,实现列表和增加表单,以及删除。
运行起来后,整体的效果和目录结果:
# 3、运行Conjure
# Conjure 模型
直接使用 conjure-java-example 中的模型和接口。
hello-api/src/main/conjure/hello.yml
types:
  definitions:
    default-package:com.palantir.conjure.examples.recipe.api
    objects:
      Temperature:
        fields:
          degree:double
          unit:TemperatureUnit

      Ingredient:
        alias:string

      RecipeName:
        alias:string

      BakeStep:
        fields:
          temperature:Temperature
          durationInSeconds:integer

      RecipeStep:
        union:
          mix:set<Ingredient>
          chop:Ingredient
          bake:BakeStep

      Recipe:
        fields:
          name:RecipeName
          steps:list<RecipeStep>

      TemperatureUnit:
        values:
          -FAHRENHEIT
          -CELSIUS

    errors:
      RecipeNotFound:
        namespace:Recipe
        code:NOT_FOUND
        safe-args:
          name:RecipeName

services:
RecipeBookService:
    name:RecipeBook
    package:com.palantir.conjure.examples.recipe.api
    base-path:/recipes
    docs:|
      APIs for retrieving recipes

    endpoints:
      createRecipe:
        http:POST/
        args:
          createRecipeRequest:
            param-type:body
            type:Recipe

      getRecipe:
        http:GET/{name}
        args:
          name:RecipeName
        returns:Recipe
        docs:|
          Retrieves a recipe for the given name.

          @paramname
                 Thenameoftherecipe

      getAllRecipes:
        http:GET/
        returns:set<Recipe>

      deleteRecipe:
        http:DELETE/{name}
        args:
          name: RecipeName
确认下 build.gradle 要生成的语言,然后运行脚本生成代码:
set PATH=D:\node-v20.13.1-win-x64;E:\local\gradle-8.13\bin;C:\Java\jdk-11.0.12\bin;%PATH%
gradle compileConjure
# SpringBoot
添加 Conjure 和 API 的依赖到server的build.gradle,修改如下:
plugins {
    id 'org.springframework.boot' version '2.5.4'
    id 'io.spring.dependency-management' version '1.0.11.RELEASE'
    id 'java'
}

dependencies {
    implementation 'org.springframework.boot:spring-boot-starter-web'
    implementation 'org.springframework.boot:spring-boot-starter-jersey'

    implementation 'com.palantir.conjure.java.runtime:conjure-java-jersey-server:6.16.0'

    implementation 'com.palantir.conjure.java.runtime:conjure-java-jaxrs-client:6.16.0'
    implementation 'org.mpierce.metrics.reservoir:hdrhistogram-metrics-reservoir:1.1.3'

    api project(':hello-api:hello-api-objects')
    api project(':hello-api:hello-api-jersey')

    testImplementation 'org.springframework.boot:spring-boot-starter-test'
    testImplementation platform('org.junit:junit-bom:5.10.2')
    testImplementation 'org.junit.jupiter:junit-jupiter'
    testRuntimeOnly 'org.junit.platform:junit-platform-launcher'
}

test {
    useJUnitPlatform()
}
然后实现 RecipeBookResource.java,添加 Spring 的注解 @Component 让这个资源能被扫描自动注册:
package com.example.helloserver.resource;

import java.util.ArrayList;
import java.util.List;
import java.util.Set;

import org.springframework.stereotype.Component;

import com.palantir.conjure.examples.recipe.api.Recipe;
import com.palantir.conjure.examples.recipe.api.RecipeBookService;
import com.palantir.conjure.examples.recipe.api.RecipeName;

@Component
public class RecipeBookResource implements RecipeBookService {
    List<Recipe> recipes = new ArrayList<>();

    @Override
    public void createRecipe(Recipe createRecipeRequest) {
        System.err.println("createRecipeRequest: " + createRecipeRequest);
        recipes.add(createRecipeRequest);
    }

    @Override
    public Recipe getRecipe(RecipeName name) {
        System.err.println("getRecipe: " + name);
        return recipes.stream().filter(r -> r.getName().equals(name)).findFirst().get();
    }

    @Override
    public Set<Recipe> getAllRecipes() {
        return Set.copyOf(recipes);
    }

    @Override
    public void deleteRecipe(RecipeName name) {
        recipes.removeIf(r -> r.getName().equals(name));
    }

}
配置jersey服务,路径为 /api,同样添加spring的标注 @Component。使用package的方式配置自动扫描目录,同时添加conjure的特性feature。JerseyConfig.java:
package com.example.helloserver;

import com.palantir.conjure.java.server.jersey.ConjureJerseyFeature;

import org.glassfish.jersey.server.ResourceConfig;
import org.springframework.stereotype.Component;

import javax.ws.rs.ApplicationPath;

@Component
@ApplicationPath("/api")// 这是所有 JAX-RS 资源的根路径
public class JerseyConfig extends ResourceConfig {

    public JerseyConfig() {
        // 注册你的 JAX-RS 资源类
        // register(HelloResource.class);

        // 如果你的资源类都在某个包下,也可以通过包扫描来注册
        packages("com.palantir.conjure.examples.recipe.api",
                "com.example.helloserver.resource",
                "com.example.helloserver.filter");

        // 注册其他 JAX-RS 特性,例如 JSON 序列化/反序列化提供者
        // Jersey 默认会处理 JSON,但有时你可能需要明确指定
        // register(org.glassfish.jersey.jackson.JacksonFeature.class); // 如果需要Jackson支持
        register(ConjureJerseyFeature.INSTANCE);
    }
}
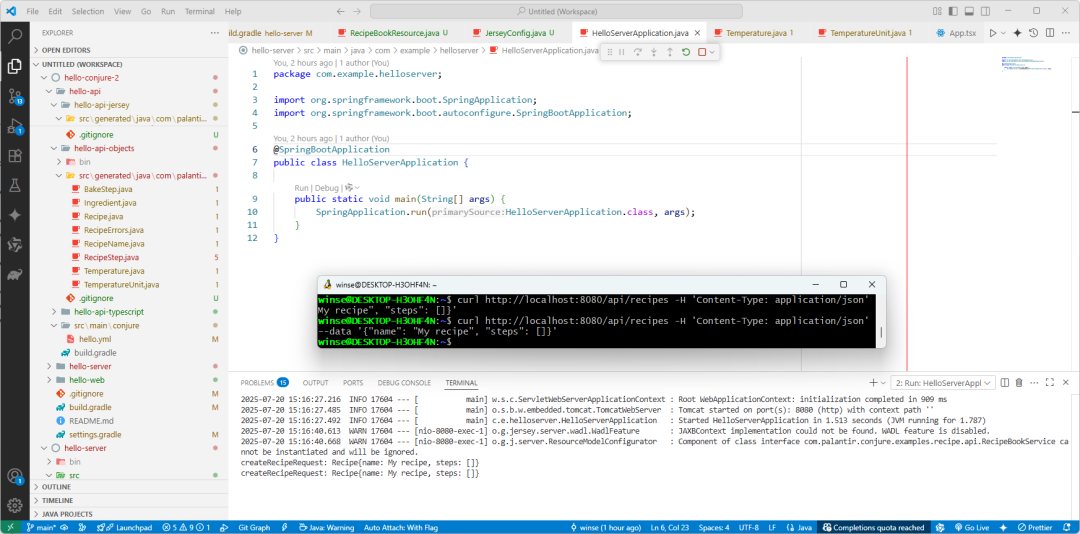
运行HelloServerApplication,使用curl提交数据:
curl http://localhost:8080/api/recipes -H 'Content-Type: application/json' --data '{"name": "My recipe", "steps": []}'
使用java提交数据,HelloClient.java:
package com.example.helloclient;

import java.nio.file.Paths;

import com.palantir.conjure.examples.recipe.api.Recipe;
import com.palantir.conjure.examples.recipe.api.RecipeBookService;
import com.palantir.conjure.examples.recipe.api.RecipeName;
import com.palantir.conjure.java.api.config.service.ServiceConfiguration;
import com.palantir.conjure.java.api.config.service.UserAgent;
import com.palantir.conjure.java.api.config.ssl.SslConfiguration;
import com.palantir.conjure.java.client.config.ClientConfigurations;
import com.palantir.conjure.java.client.jaxrs.JaxRsClient;
import com.palantir.conjure.java.okhttp.NoOpHostEventsSink;

public class HelloClient {

    public static void main(String[] args) {
        RecipeBookService recipeBookService = JaxRsClient.create(
                RecipeBookService.class,
                UserAgent.of(UserAgent.Agent.of("hello", "0.0.1")),
                NoOpHostEventsSink.INSTANCE,
                ClientConfigurations.of(ServiceConfiguration.builder()
                        .addUris("http://localhost:8080/api/")
                        .security(SslConfiguration.of(Paths.get("C:\\Java\\jdk-11.0.12\\lib\\security\\cacerts")))
                        .build()));
        recipeBookService.createRecipe(Recipe.builder().name(RecipeName.of("java client")).build());
    }

}
# React web
下面具体介绍Web连服务器。
前面已经配置生成了typescript的代码 hello-api-typescript,下载依赖并编译它:
winse@DESKTOP-H3OHF4N:hello-conjure-2$ cd hello-api/hello-api-typescript/src/
winse@DESKTOP-H3OHF4N:src$ yarn
yarn install v1.22.22
info No lockfile found.
[1/4] Resolving packages...
[2/4] Fetching packages...
[3/4] Linking dependencies...
[4/4] Building fresh packages...
success Saved lockfile.
Done in 5.38s.
winse@DESKTOP-H3OHF4N:src$ yarn build
yarn run v1.22.22
$ tsc
Done in 0.65s.
在hello-web中引入 hello-api-typescript 和 conjure-client 。
使用软连接的方式添加本地库,这样改变不需要重新下载依赖,在api还不太稳定的情况下方便一点。
winse@DESKTOP-H3OHF4N:hello-web$ yarn add conjure-client
winse@DESKTOP-H3OHF4N:hello-web$ yarn add link:../hello-api/hello-api-typescript/src/
添加依赖后 package.json 的内容如下:
"dependencies":{
    "conjure-client":"^2.15.0",
    "hello-api":"link:../hello-api/hello-api-typescript/src/",
    "react":"^17.0.2",
    "react-dom":"^17.0.2",
    "typescript":"^4.4.4"
  },
新增上下文用来提供service,并在组件中调用服务提交数据和获取数据,实现如下:
ServiceContext.ts
import { FetchBridge, IHttpApiBridge } from "conjure-client";
import { IRecipeBookService, RecipeBookService } from "hello-api";
import React from "react";


export interface IServiceContextProps {
recipeBookService: IRecipeBookService;
}

export class ServiceContextProps implements IServiceContextProps {
private bridge: IHttpApiBridge;

constructor() {
    this.bridge = new FetchBridge({
      baseUrl: "http://127.0.0.1:8080/api",
      userAgent: { productName: "hello", productVersion: "1.0.0" }
    });
  }

public get recipeBookService(): IRecipeBookService {
    return new RecipeBookService(this.bridge);
  }
}

export const ServiceContext = React.createContext<ServiceContextProps | null>( null);
App.tsx
import React from 'react';
import ExampleComponent from './components/ExampleComponent';
import { ServiceContext, ServiceContextProps } from './context/ServiceContext';

const App: React.FC = () => {
    return (
        <ServiceContext.Providervalue={newServiceContextProps()}>
        <div>
            <h1>Welcome to Hello Web</h1>
            <ExampleComponent />
        </div>
        </ServiceContext.Provider>
    );
};

export default App;
ExampleComponent.tsx
import { IRecipe } from "hello-api";
import React, { useState, ChangeEvent, FormEvent, useContext } from "react";
import { ServiceContext } from "../context/ServiceContext";

const ExampleComponent: React.FC = () => {
    const ctx = useContext(ServiceContext); // 获取上下文

    const [items, setItems] = useState<IRecipe[]>([]);
    const [title, setTitle] = useState("");

    const loadItems = async () => {
        const recipes = await ctx!.recipeBookService.getAllRecipes();
        setItems(recipes);
    };

    const handleTitleChange = (e: ChangeEvent<HTMLInputElement>) => setTitle(e.target.value);

    const handleAdd = async (e: FormEvent) => {
        e.preventDefault();
        if (!title.trim()) return;

        await ctx?.recipeBookService.createRecipe({ name: title.trim(), steps: [] });

        loadItems();
        setTitle("");
    };

    const handleDelete = async (name: string) => {
        await ctx?.recipeBookService.deleteRecipe(name);
        loadItems();
    };

    return (
        <div>
            <h2>列表</h2>
            <ul>
                {items.map((item) => (
                    <li key={item.name}>
                        <strong>{item.name}</strong>
                        <button onClick={() => handleDelete(item.name)} style={{ marginLeft: 8 }}>
                            删除
                        </button>
                    </li>
                ))}
            </ul>
            <h2>新增</h2>
            <form onSubmit={handleAdd}>
                <input type="text" placeholder="标题" value={title} onChange={handleTitleChange} required />
                <button type="submit">添加</button>
            </form>
        </div>
    );
};

export default ExampleComponent;
此时运行是报错的,服务器端口8080,前端页面是3000的。还需要处理下跨域的问题。添加CorsConfig.java:
package com.example.helloserver.filter;

import java.io.IOException;

import javax.ws.rs.container.ContainerRequestContext;
import javax.ws.rs.container.ContainerResponseContext;
import javax.ws.rs.container.ContainerResponseFilter;
import javax.ws.rs.ext.Provider;

import org.springframework.stereotype.Component;

@Component
@Provider
public class CorsFilter implements ContainerResponseFilter {
    @Override
    public void filter(ContainerRequestContext req, ContainerResponseContext res) throws IOException {
        res.getHeaders().add("Access-Control-Allow-Origin", "http://localhost:3000");
        res.getHeaders().add("Access-Control-Allow-Credentials", "true");
        res.getHeaders().add("Access-Control-Allow-Headers", "origin, content-type, accept, authorization, fetch-user-agent"); //!!!
        res.getHeaders().add("Access-Control-Allow-Methods", "GET, POST, PUT, DELETE, OPTIONS, HEAD");
    }
}
修改JerseyConfig,把filter添加到扫描路径:
        packages("com.palantir.conjure.examples.recipe.api",
                "com.example.helloserver.resource",
                "com.example.helloserver.filter");
重启服务,用web再提交,这次算是完美。新增后,服务端的日志也输出,web的列表立即更新了。

# 思考
这个例子整了很久,涉及到前后端几个工程来来回回的切换。诚不欺我,第一步确实是比较艰难的。
环境搭建好以后,写好模型,然后生成代码,最后调用服务其实很简单的。完全不用费脑子去这些中间的胶水代码,你只需要关注模型,其他的 Conjure 都给你搞定了。
下一篇将对接一下高德的导航接口。
Related
Related posts
-
conjure-dart 更新:别名类型 alias 代码生成实现
2025-11-16
-
MVC 常用常新,温故知新:纵你虐我千百遍 我仍待你如初见
2025-09-10
-
Conjure实战:对接高德导航 API(驾车导航)
2025-07-21
-
Conjure使用指南:告别接口API对接烦恼,拥抱高效开发
2025-07-20